Inspecting your hives: a fieldwork guide
Hive inspections are the cornerstone of successful queen breeding, but they can be time-consuming. QueenBees streamlines this process with Focus Mode, a mobile-optimized interface designed for fast, efficient work directly in the apiary.
Tip
Based on you current subscription, you can work with our application with as many employees as you want on location. Each person can log in with their own QueenBees account on their device, and all changes sync in real-time - so you can see always current status.
This guide walks you through a complete inspection workflow, from adding a new queen to checking her progress and handling common outcomes like finding a successfully mated queen or dealing with a loss.
What you’ll learn
- How to use Focus Mode to create a dynamic to-do list for your inspections.
- The process of adding a naturally mated queen to a hive.
- How the system automatically updates a queen’s status to “Potentially Breeding”.
- How to record inspection outcomes: confirming a mated queen, taking a queen, or marking a queen as lost.
Step 1: Prepare for inspection with Focus Mode
Before you even put on your bee suit, QueenBees helps you plan your day. Focus Mode is your digital assistant in the field.
- Enter focus mode: Tap the target icon in the top toolbar from anywhere in the app.
- Select your location: If you manage multiple apiaries, choose the one you’re working at today.
- Filter for your queens: Tap the filter icon. For today’s inspection, we want to check on queens that should be laying. Select the
Potentially Breeding(PB) status.
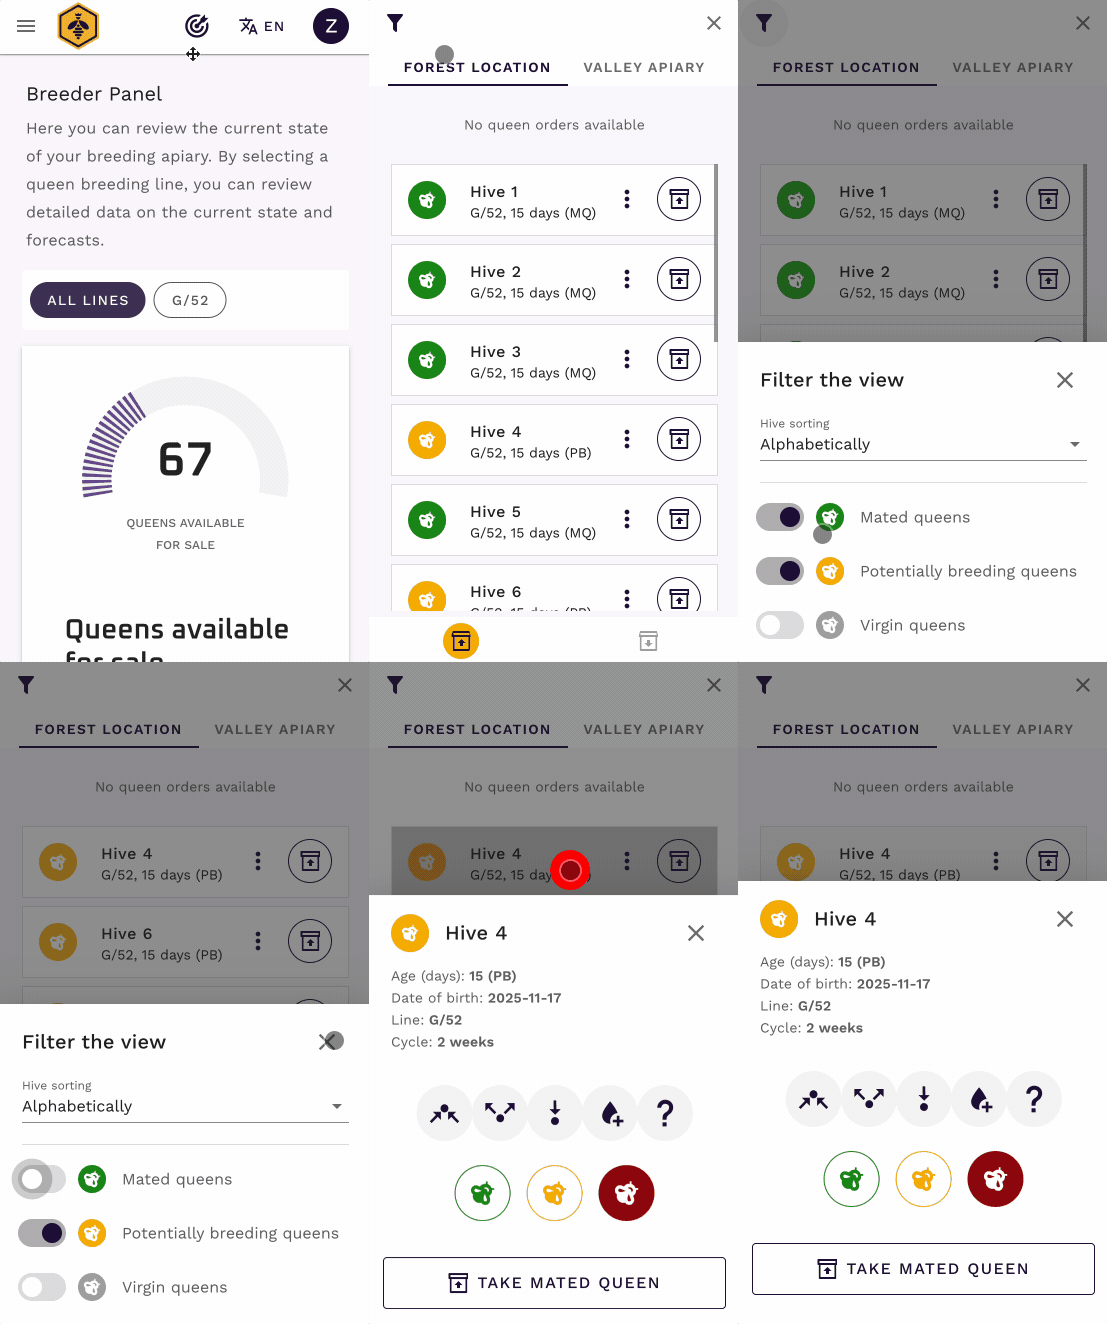
You now have a clean, actionable list of all hives that need inspection. The app has done the prep work for you.
Step 2: The Inspection - What to do at the hive
With your list of hives ready in Focus Mode, you head to the apiary. You’ll be looking for signs of a healthy, laying queen.
Scenario A: The queen is mated and laying (Success!)
You open a hive and find a beautiful laying pattern. The queen has successfully mated. It’s time to update her status.
- In Focus Mode, find the hive on your list.
- Tap the hive card to open the details.
- Click the green “Confirm mated” button with bee icon.
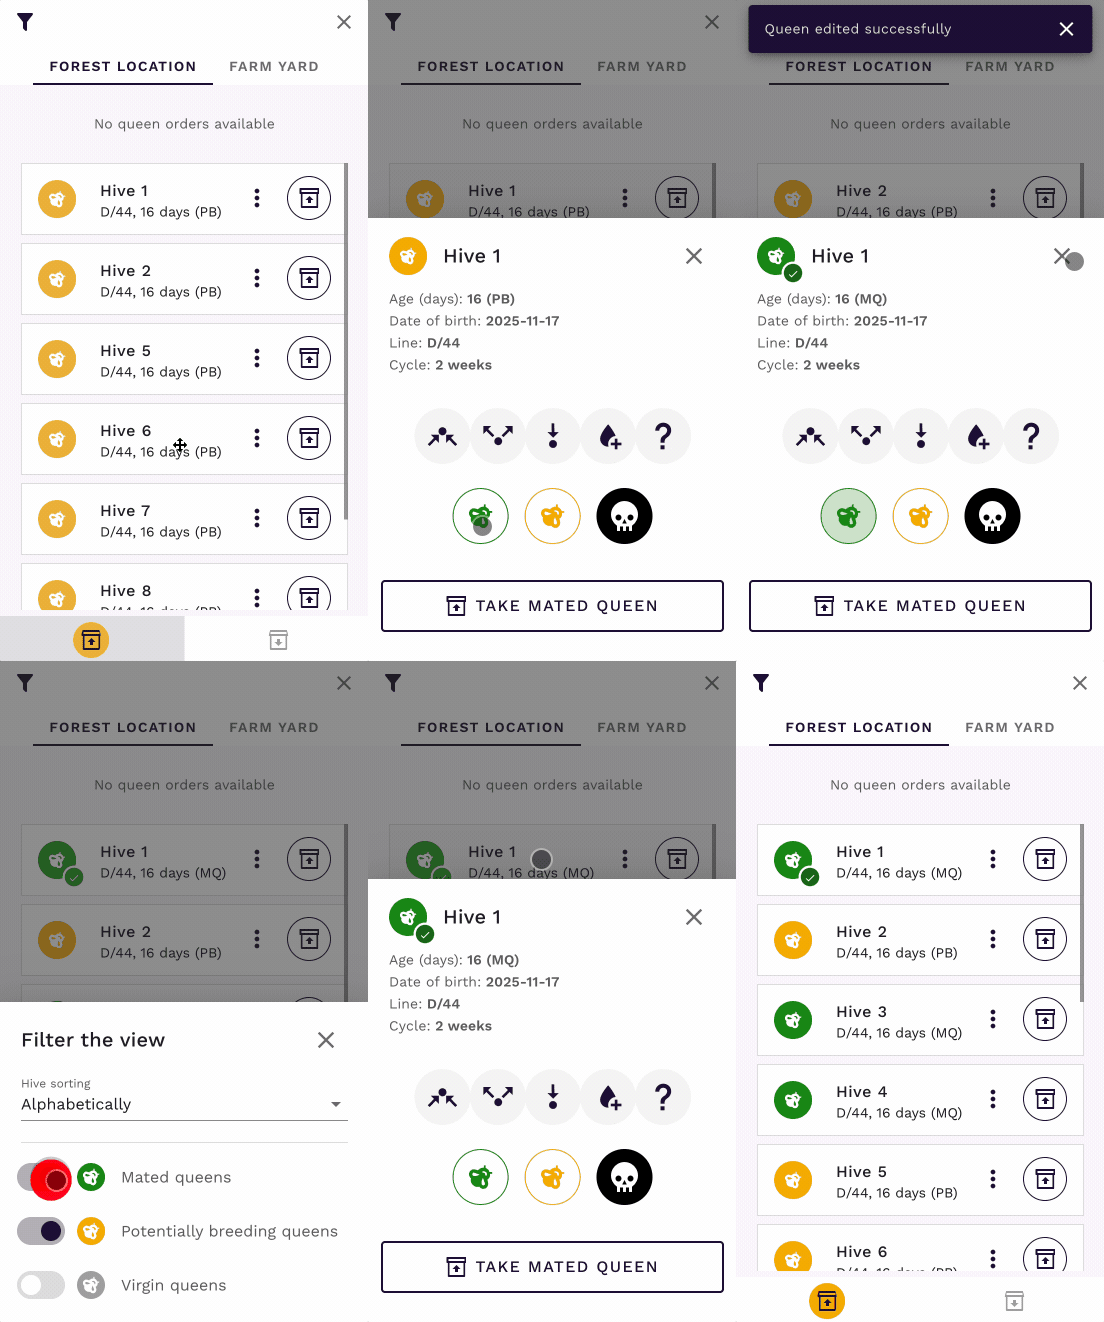
The queen’s status instantly changes from Potentially breeding (yellow - PB) to Mated queen (green - MQ).
You can leave her in the hive to continue building the colony, or she is now ready to be sold or moved.
Also - as you confirmed queen with your own eyes, the system will indicate that it was inspected with small green checkmark next to the status.
Scenario B: The queen is in the hive but not laying eggs (partial success)
You open a hive and find a queen without fresh brood. It seems that it’s made it mating flight, but still it’s not fully confirmed if the queen has successfully mated. Let’s update her status.
- In Focus Mode, find the hive on your list.
- Tap the hive card to open the details.
- Click the yellow “Confirm potentially breeding” button with bee icon.
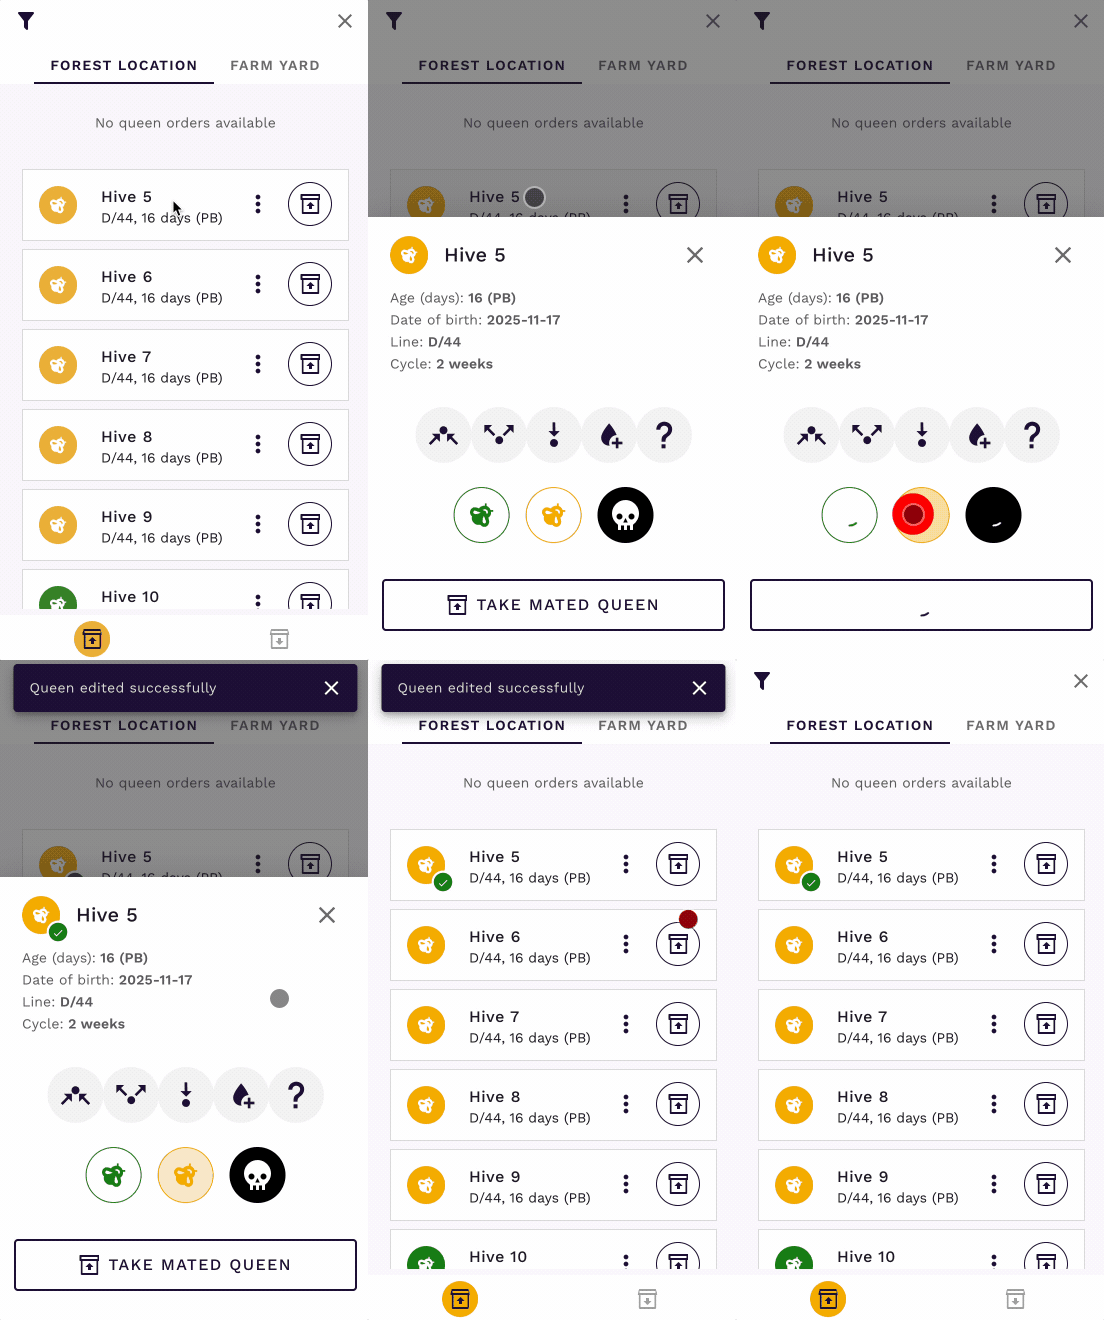
The queen’s status remains as Potentially breeding (yellow - PB), but now it’s confirmed that she is present in the hive. Small green checkmark will appear next to the status, indicating that it was inspected with your own eyes.
Scenario C: We need to take the queen to fulfill an order
If your goal was to raise this queen for sale, and she is now confirmed as mated, you can “take” her.
- On the same hive detail screen in Focus Mode, click the “Take mated queen” button.
- You can take also a potentially breeding queen if you wish. Her status will be changed to mated accordingly.
- 10 seconds of confirmation animation will play, allowing you to react if there was a mistake. You can cancel the action during this time.
- The hive status will change to
Empty, ready for the next queen or cell. - (in preparation) The queen is now marked as available in your inventory, ready to be assigned to a customer order.
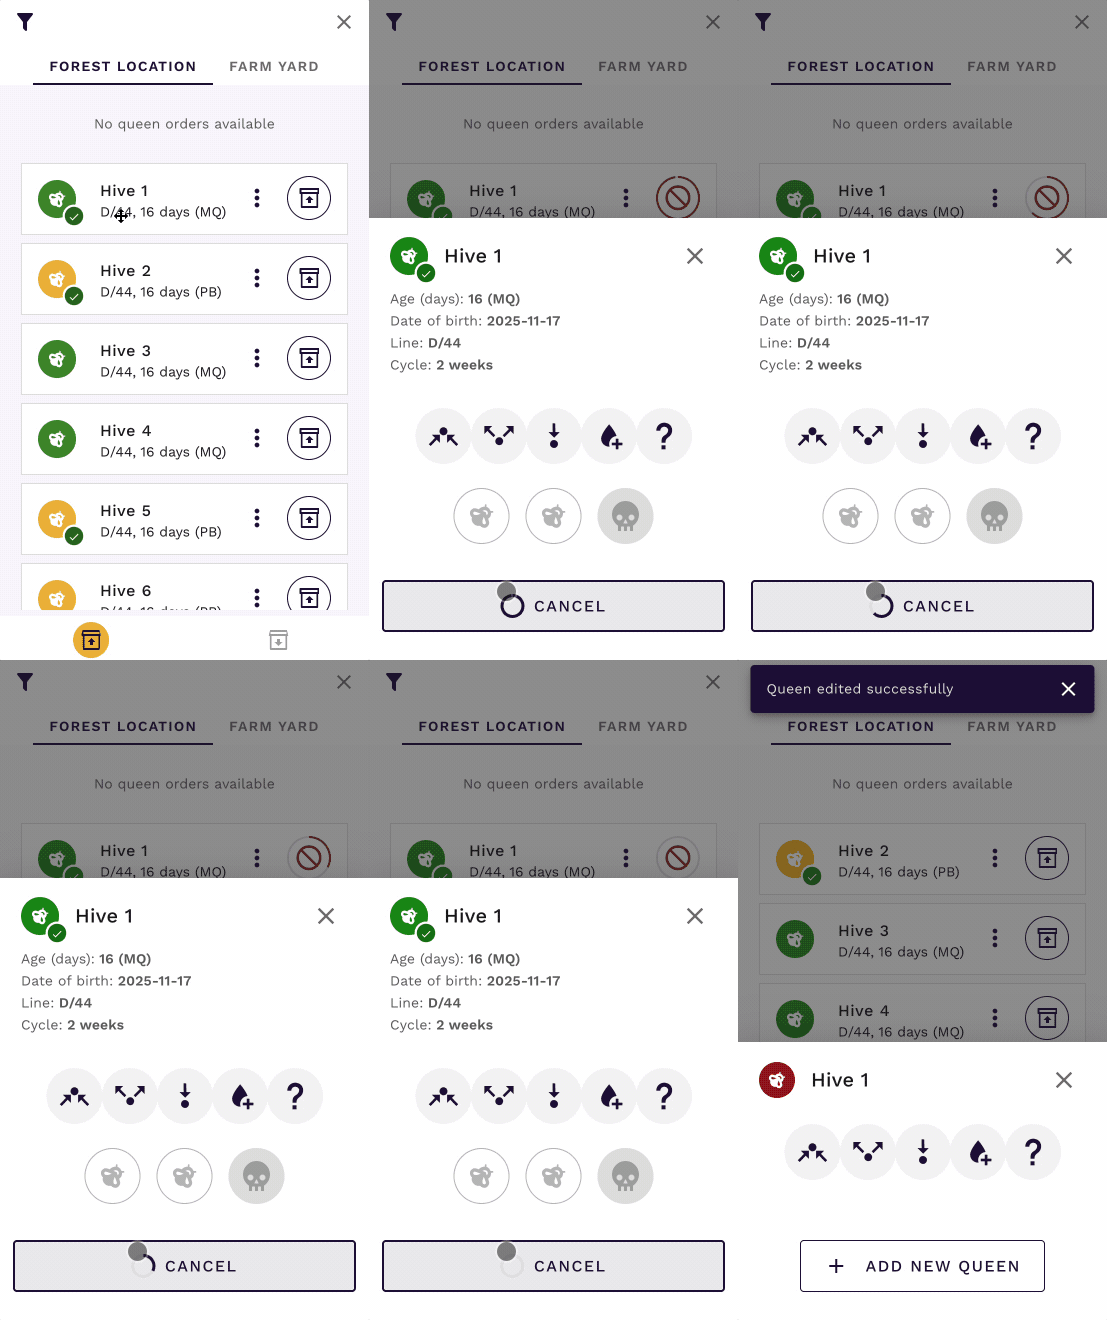
We know you work fast in the field, so you don’t need to mark each hive as empty. You can always pause after every 5-10 hives and mark them within seconds as empty from the Focus Mode. We’re working on a bulk actions for locations to make this even faster in the future.
Scenario D: The queen is lost!
Sometimes, things don’t go as planned. You inspect the hive and find no queen and no eggs. She may have been lost during her mating flight.
- In Focus Mode, find the hive.
- Tap the hive card to open the details.
- Click the black “Mark as lost” button with skull icon.
- 10 seconds of confirmation animation will play, allowing you to react if there was a mistake. You can cancel the action during this time.
- The hive status will change to
Empty, ready for a new queen.

This action is crucial for accurate record-keeping. The system will:
- Record the queen as lost, updating your success-rate statistics for whole location.
- Make the hive available for a new queen, so no time is wasted.
Scenario E: Adding a queen into hive for natural mating
Your inspections will create empty hives. Let’s fill one. You have a batch of queen cells ready to be put into the hive.
- Stay in Focus Mode and switch to “Insert Mode” using the button at the bottom.
- Select the Batch: Choose the batch of naturally mated queens you’re working with from the top selector. If there are more than one batch you can switch between them here.
- Find an Empty Hive: Your screen now shows all empty hives at the location.
- Add the Queen: Tap the hive with arrow down button on the hive you want to place her in.
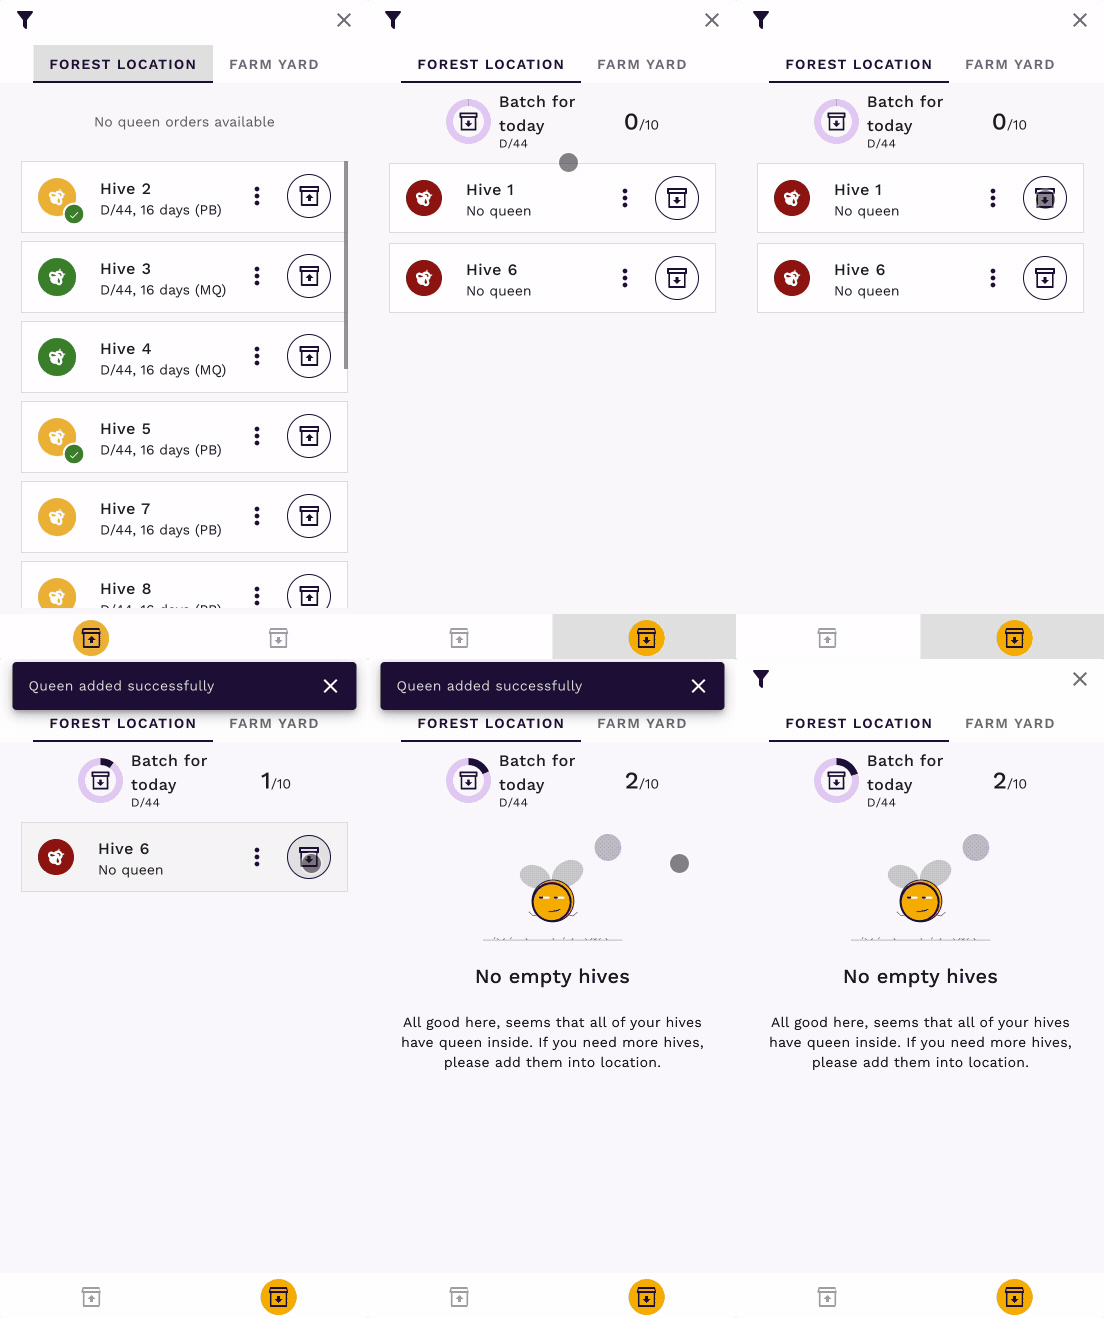
The hive is now Active with a new queen. The system automatically knows her lineage, age, and status, all from the batch information.
Scenario F: Marking a hive for a future task
Not every inspection ends with a final decision. Sometimes, a hive just needs a little more time or a specific follow-up action. For this, you can use To-Do flags.
On each hive card, you’ll find a set of icons for quick task marking:
- Add more bees: sometimes you’ll see that mating hive is lacking bees - so much needed for productive queen mating proces. You can always add bees from other hive, who has to many. Use flag with two arrows pointing to center to mark this task.
- Take bees from hive: when the hive population is too strong, it can hinder the mating process. Use flag with two arrows pointing outwards to mark this task.
- Fill hive with bees: sometimes, the hive might be completely empty. You may need to introduce a new colony ther. Use the flag with a single arrow pointing down to mark this task.
- Feed the bees: when your bees are in need for food, you can mark this task with the flag showing a drop of liquid with small plus.
- Other/Custom: Add a custom to-do note for any other action. Use question mark icon to mark this task. You can enter your own text or choose from latests, most popular notes. Custom task is always visible at hive card in Focus Mode.
To mark a task, simply tap the corresponding icon. It will light up, and the task will be saved for that hive. Tap it again to mark it as complete.
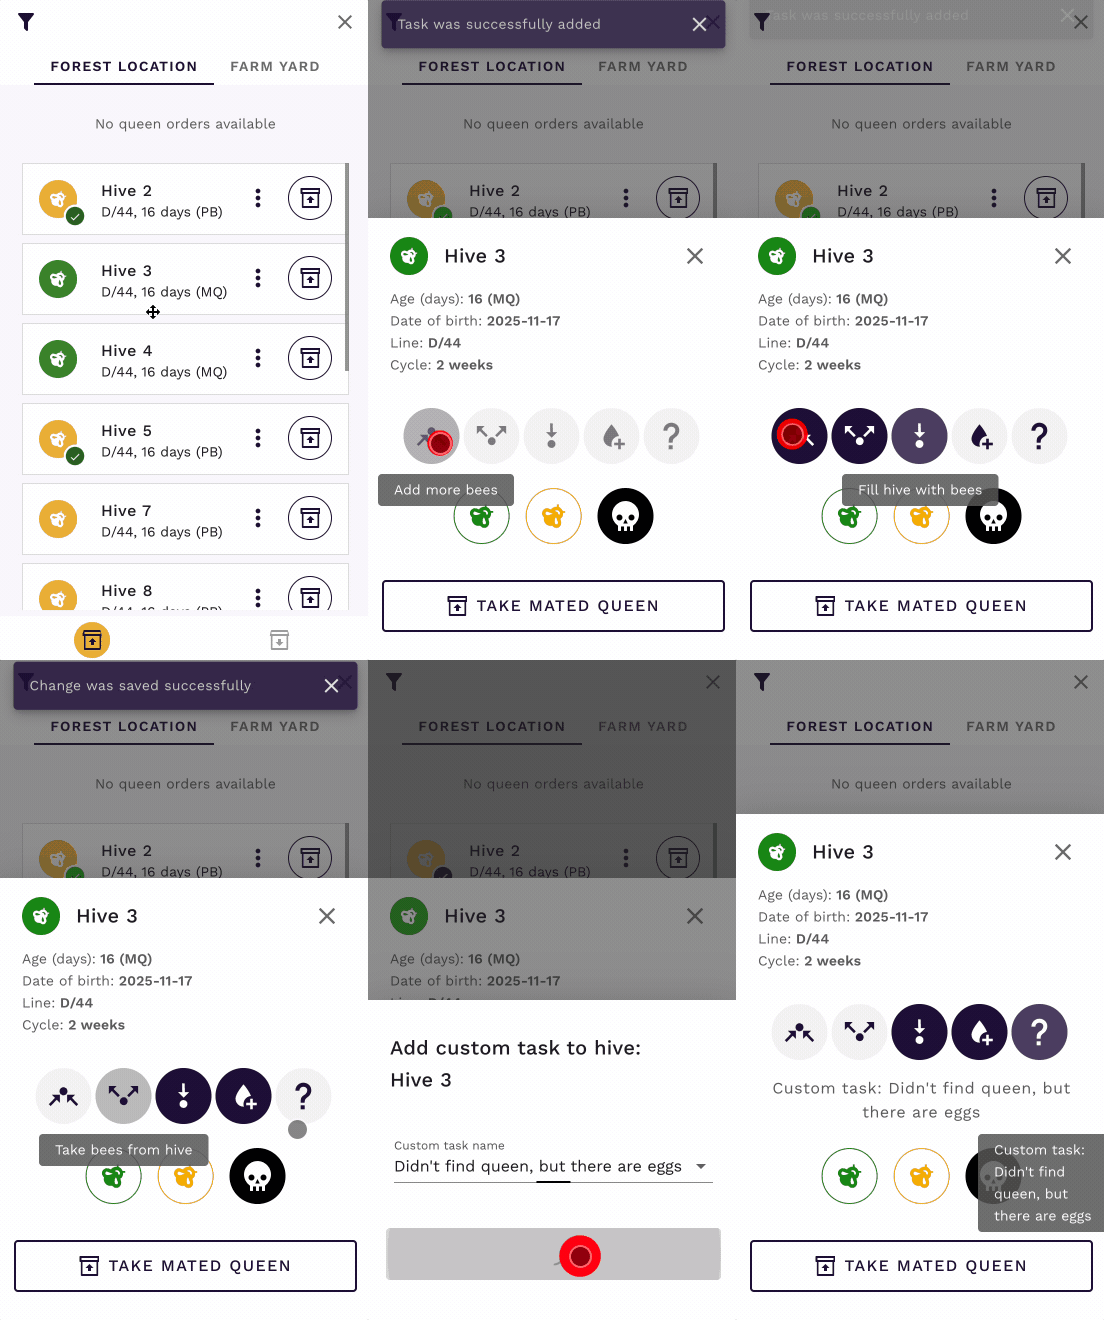
This feature is incredibly useful for planning. Before your next trip to the apiary, you can filter your hives by to-do status to create an instant work plan.
Conclusion
By using Focus Mode, hive inspections are no longer just about checking bees—they become a streamlined part of your entire queen breeding workflow. You can plan your work, record outcomes instantly, and take action on the spot, whether that’s confirming a successful queen, marking a loss, or introducing a new one.
You can work on location with many employees simultaneously, each using their own device logged into the different QueenBees account. Everyone’s progress syncs in real-time, ensuring that your records are always up-to-date and you’re not duplicating your work.
This digital approach to fieldwork saves time, reduces errors, and gives you a precise, real-time overview of your entire operation.