10-Minute Quick Start Guide
Welcome to QueenBees! This quick start guide will have you up and running with professional queen breeding apiary management in just 10 minutes. You’ll learn the essential steps to transform your beekeeping operation from paper records to digital efficiency.
What You’ll Accomplish
By the end of this guide, you’ll have:
- Set up your apiary account with professional structure
- Added your first hives to the system
- Recorded your queens with proper tracking
- Viewed your apiary statistics and breeding forecasts
This foundation will let you immediately start benefiting from digital record-keeping while exploring QueenBees’ advanced features at your own pace.
Before You Begin
Prerequisites
Make sure you have:
- A QueenBees account - Create one here if needed
- Active login access - Sign in at https://app.queenbe.es/
- Basic apiary information - Names of your breeding lines and main location
What Information You’ll Need
Gather this information before starting:
- Your apiary’s name (can be shortened - you can change it later)
- Country location for regulatory and weather data
- Promotional code (optional) for expanding 3-months free trial to longer period
Tip
Look for the exclusive, promotional codes on our website - we will annouce special occassions with the banner at the top of the page.
- Queen breeding lines you currently work with
- Main location name where most hives are located
- Current hive names (or numbering system you prefer)
Note
Don’t worry about perfection - everything you enter can be modified later as your operation grows and changes.
Step 1: Set Up Your Apiary Profile
The initial setup process takes just three quick steps to establish your apiary’s digital foundation.
Select Country and Name Your Apiary
Choose your country for localized features like weather data and regulatory compliance.
Name your apiary using a practical, shortened version of your business name. This appears throughout the application, so keep it concise and professional.
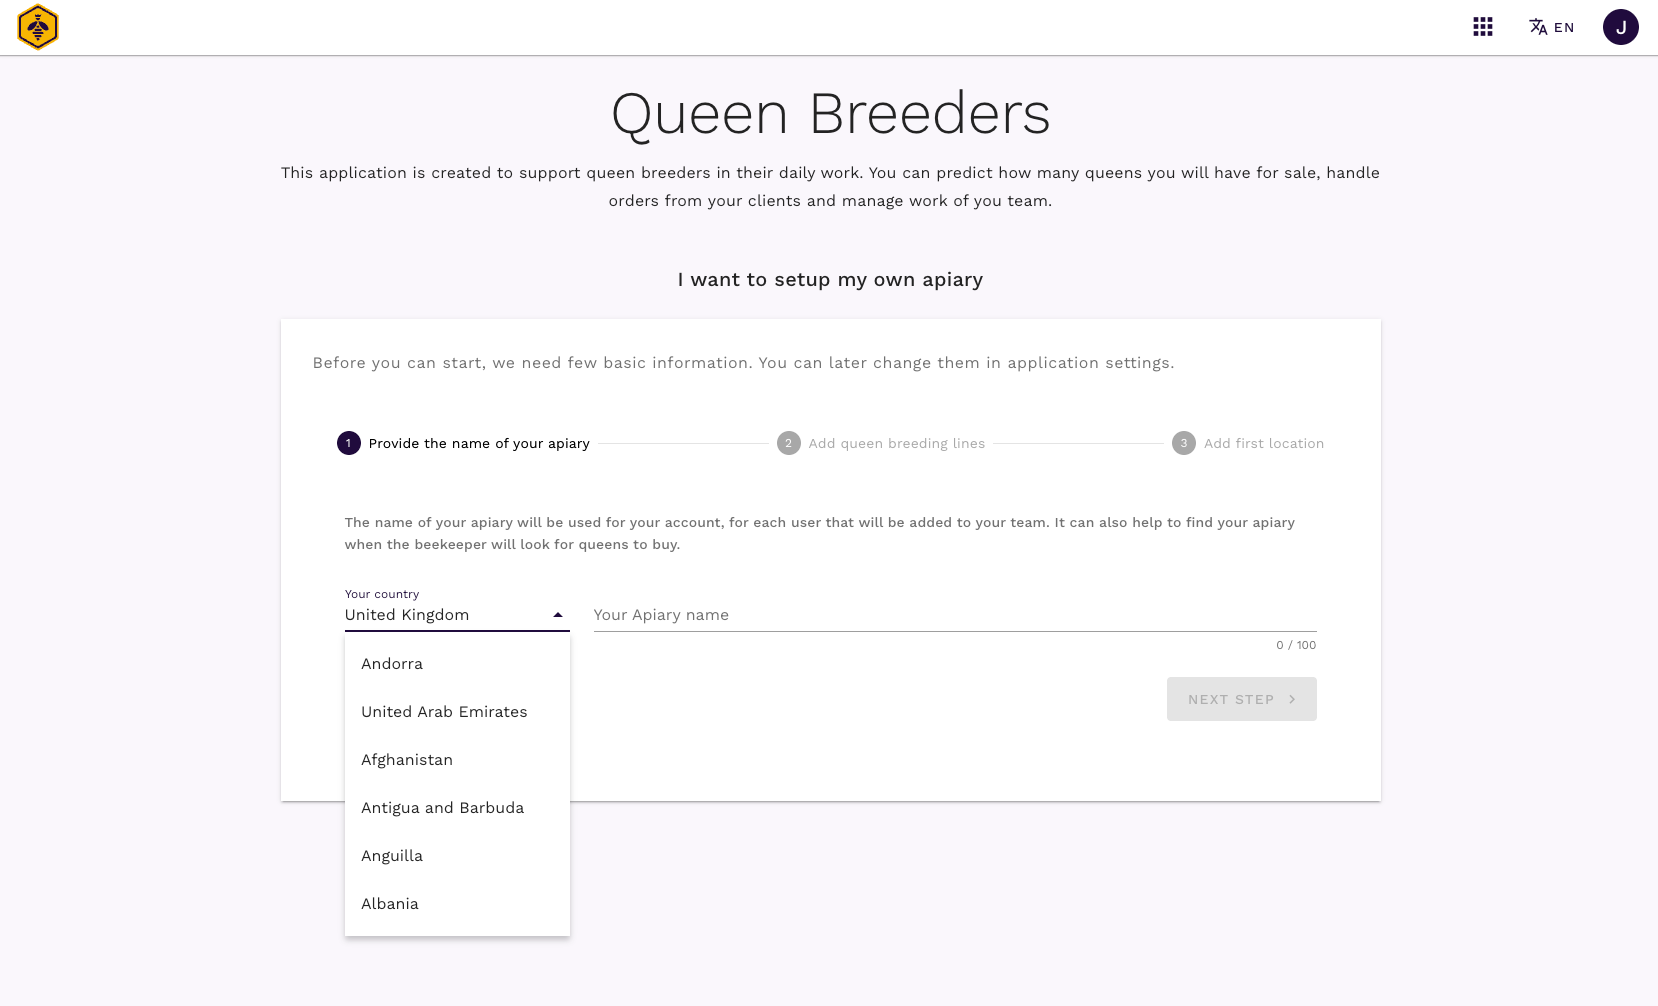
Hint
Use a shortened version here - your full business name can be added to company details later.
Add Your Queen Breeding Lines
Enter the genetic lines you currently work with in your breeding program. These form the foundation of your queen tracking system.
Use practical names that you and your team will recognize easily. Add multiple lines by pressing Tab or Enter after each entry.

Common breeding lines include:
- Carnica varieties
- Buckfast strains
- Local adaptations
- Hybrid lines
- VSH (Varroa Sensitive Hygiene) lines
Name Your Primary Location
Define your main apiary location where most hives are situated. Keep names simple and recognizable - avoid full addresses for security and simplicity.
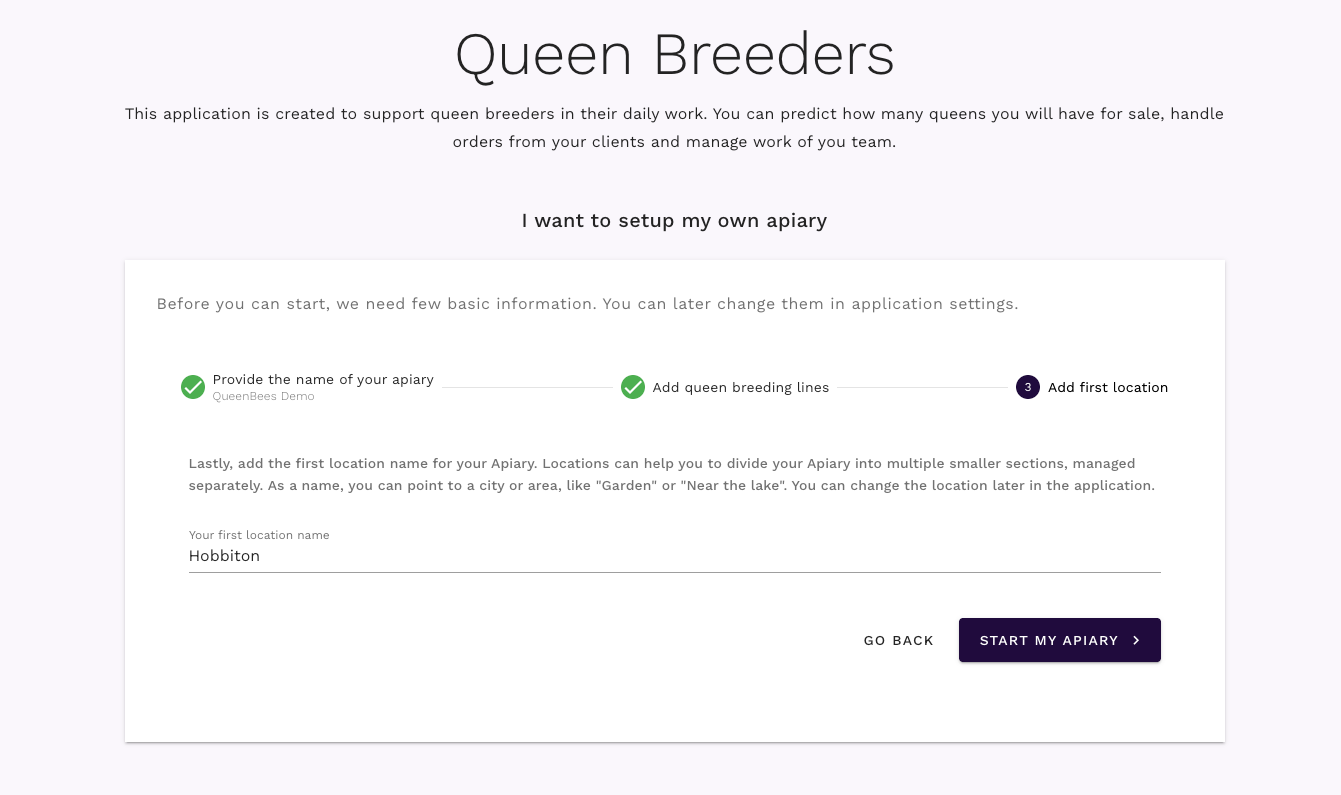
Good location names:
- “Home Yard”
- “Main Apiary”
- “North Field”
- “Meadow Site”
Complete the Setup
Click “Start my Apiary” to activate your account with full functionality.
Congratulations! You now have 3 months of full access to explore all QueenBees features. This gives you time to fully evaluate how the platform can improve your operation.
Step 2: Add Your First Hives
Now let’s populate your apiary with actual hive records.
Navigate to Your Main Location
Access your location through Locations → [Your Main Location Name] in the left navigation menu.
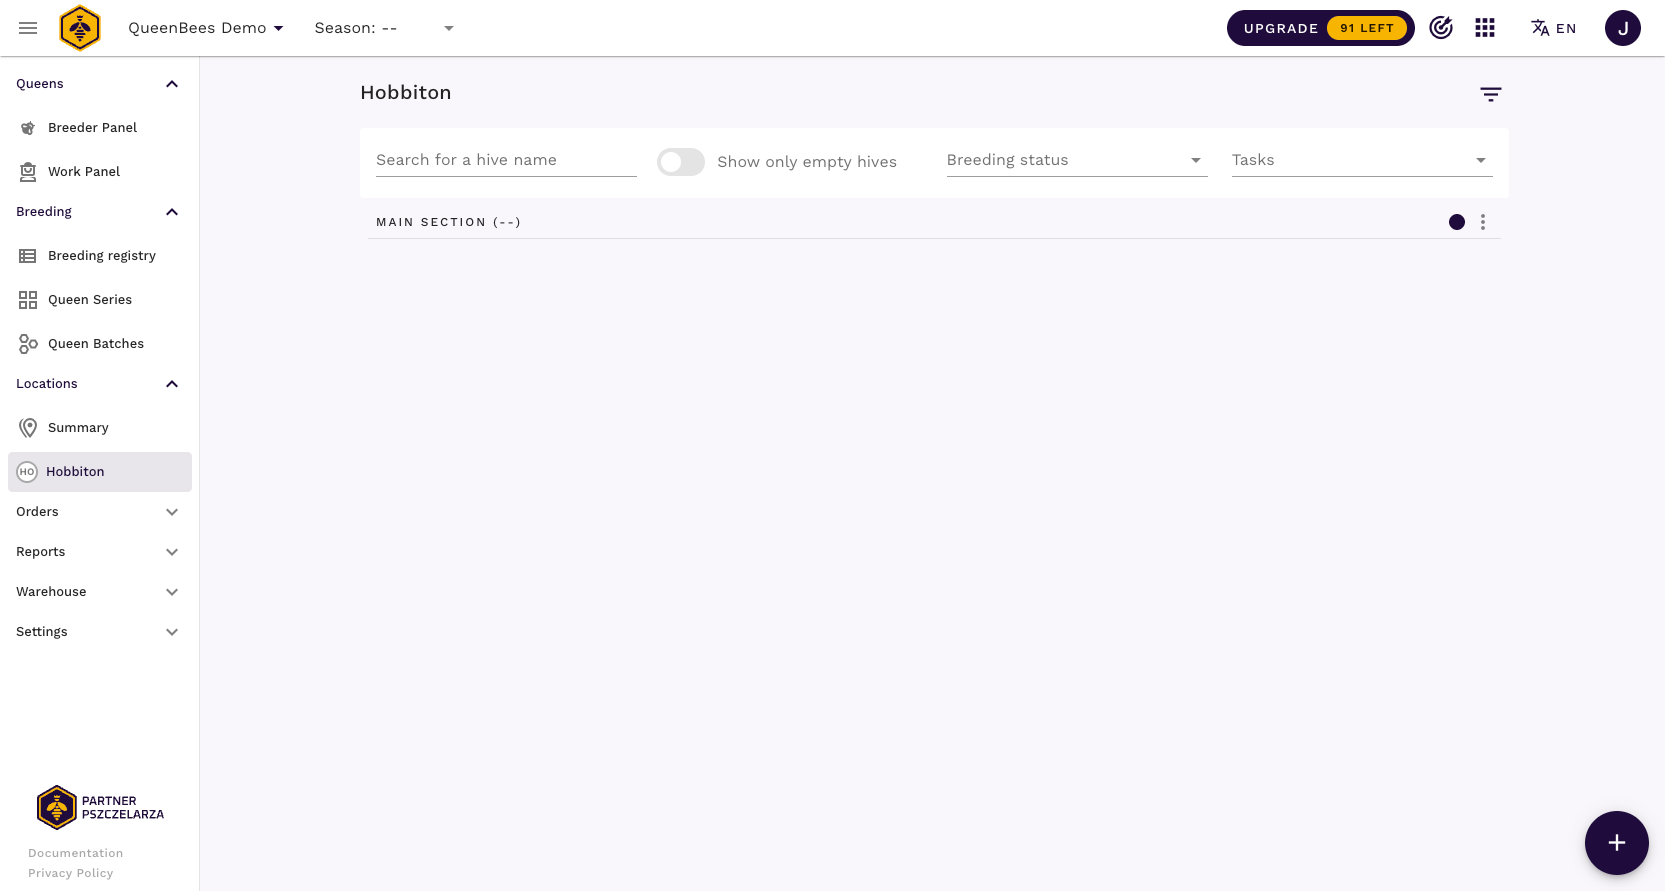
Your location starts empty - let’s change that by adding real hive data.
Create Hives Efficiently
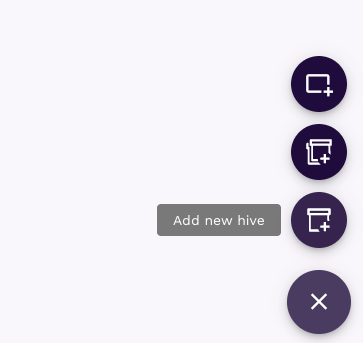
Most actions in QueenBees start from the circular (+) button in the bottom-right corner.
Click the (+) icon and select ‘Add new hive’
Enter your hive name using your preferred naming system
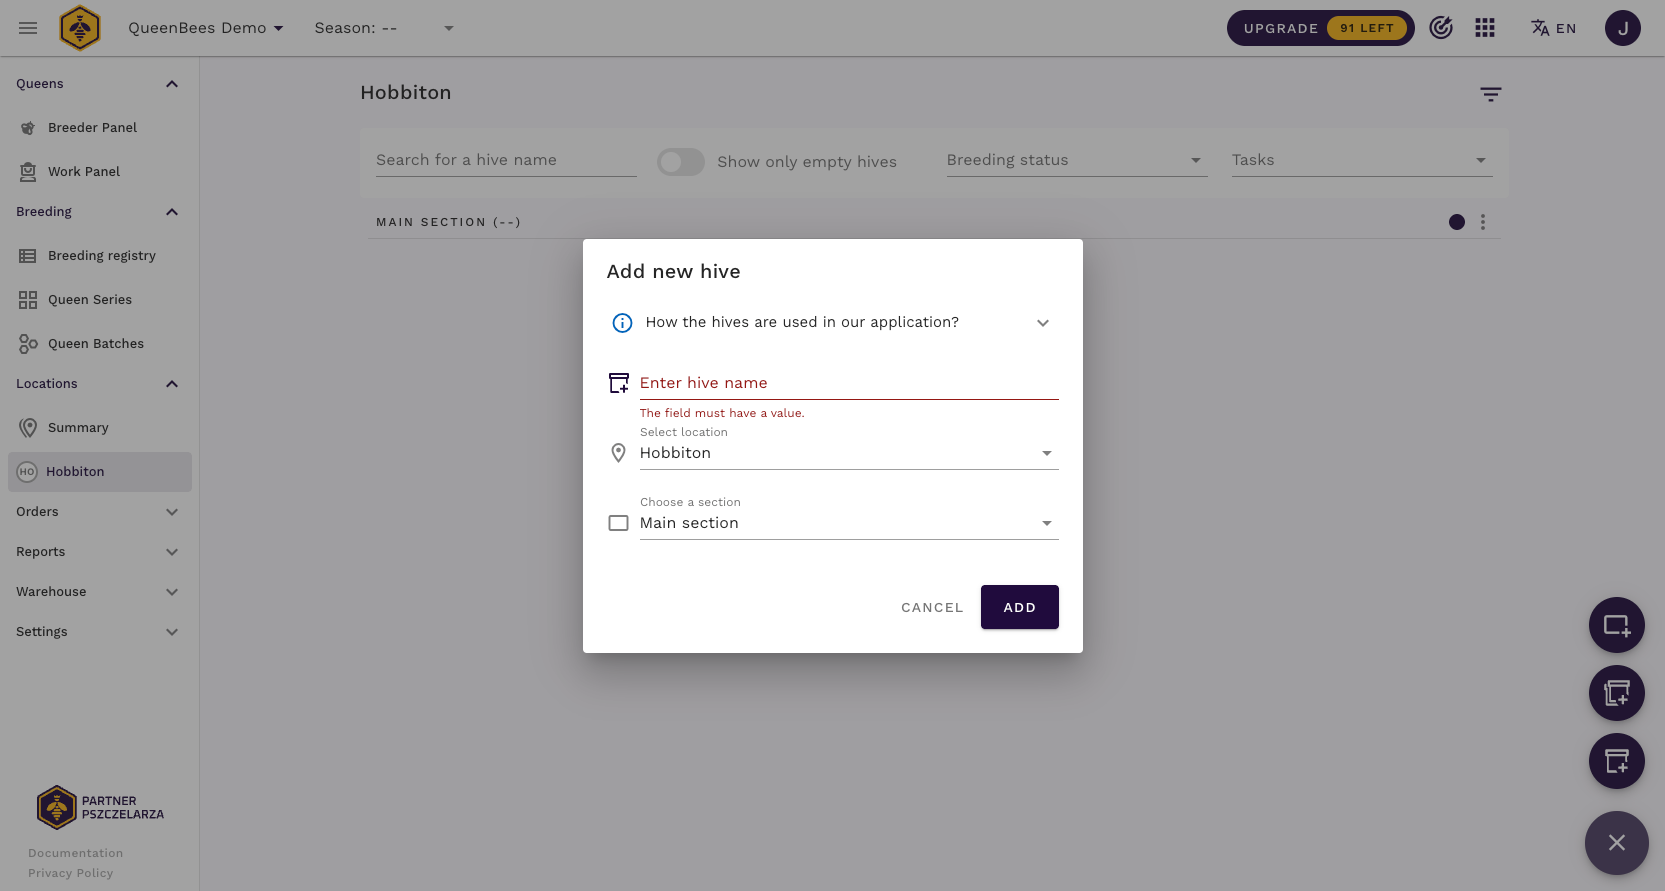
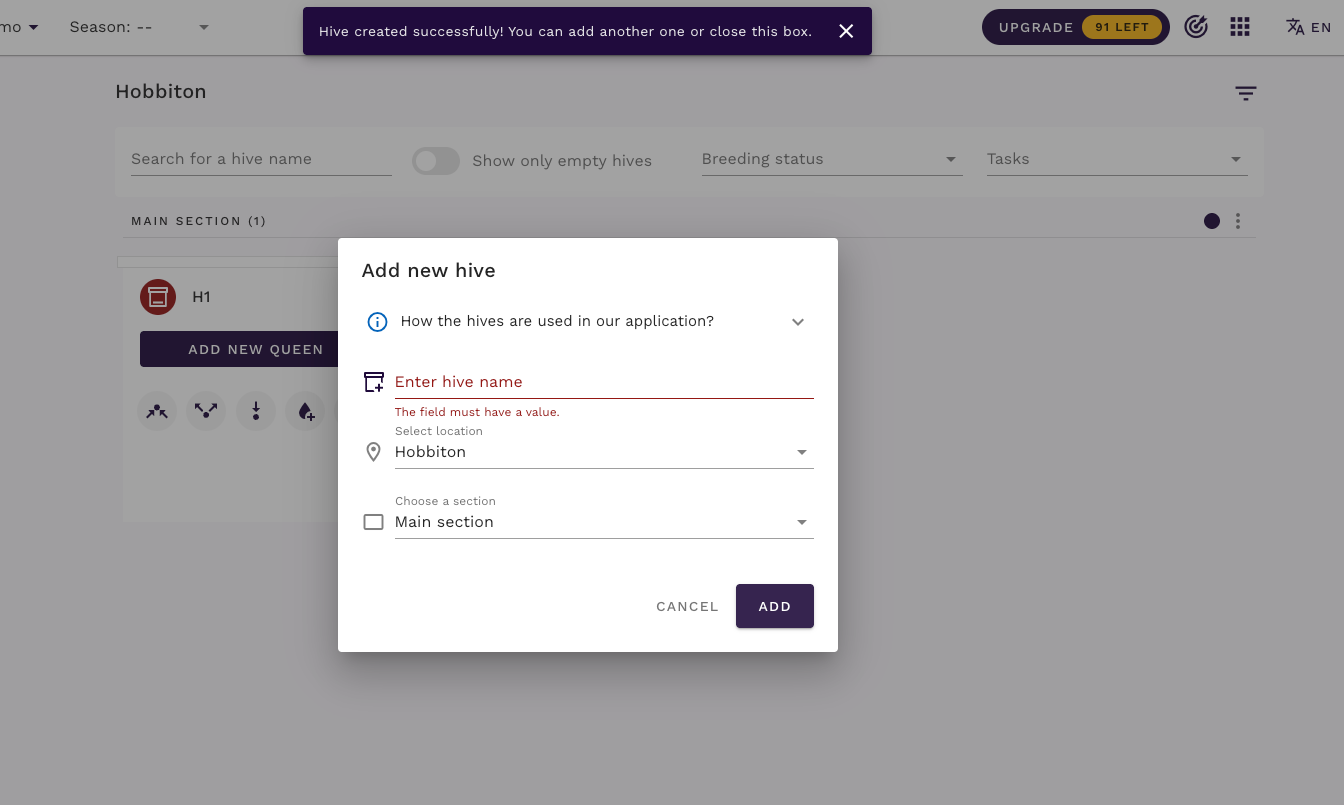
Add multiple hives - the modal stays open for batch entry
Hint
Keyboard shortcuts for efficiency:
Esc- Close modal windowEnterorCtrl+S(Windows) /Cmd+S(Mac) - Save entry
Master these shortcuts to speed up data entry significantly! Learn more productivity tips here.
Hive Naming Best Practices:
- Use consistent numbering (H001, H002) or naming (North-1, South-A)
- Keep names short but descriptive
- Consider location indicators for large operations
- Plan for expansion in your numbering system
Tip
Need to add many hives at once? For larger operations, QueenBees offers bulk hive creation and advanced hive and location management features that can save hours of data entry time.
Step 3: Record Your Queens
Now add queen records to track your breeding stock professionally.
Add Queens to Hives
Locate empty hives - each shows an ‘Add new queen’ button
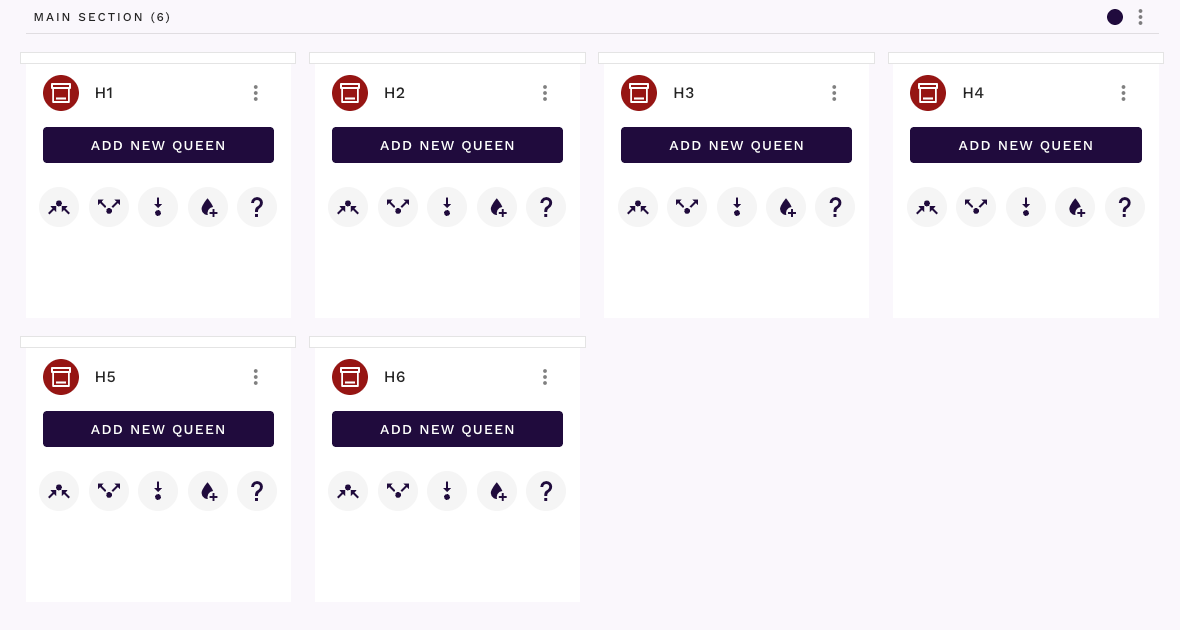
Click ‘Add new queen’ to open the queen registration modal
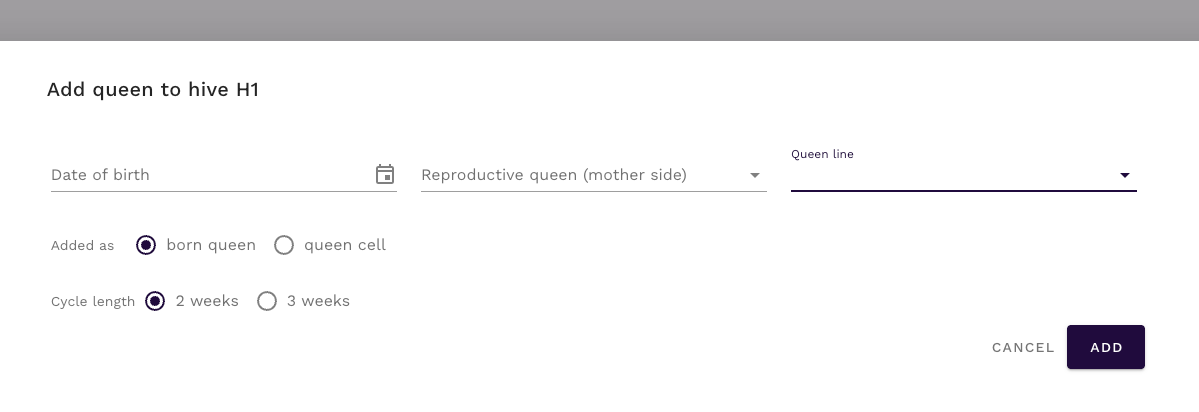
Complete essential information:
Date of Birth: Enter the actual or estimated birth date
- Affects age calculations and breeding schedules
- Determines year marking color automatically
- Impacts productivity forecasts
Queen Line: Select from the lines you defined during setup
- Links to your breeding program
- Enables genetic tracking
- Supports breeding analysis
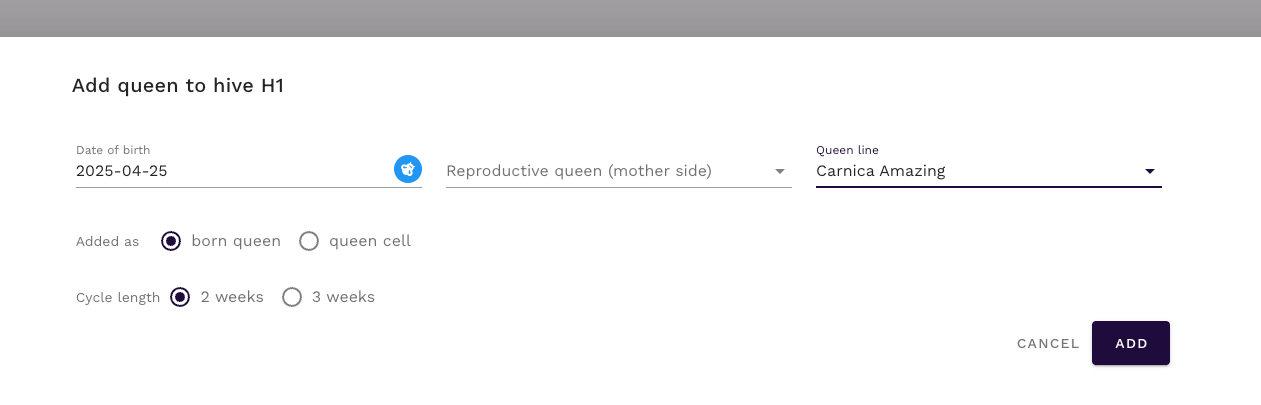
Notice how the system automatically assigns the correct year marking color (blue for 2025) based on the birth date.
Save the queen record by clicking ‘Add’
Review Your Progress
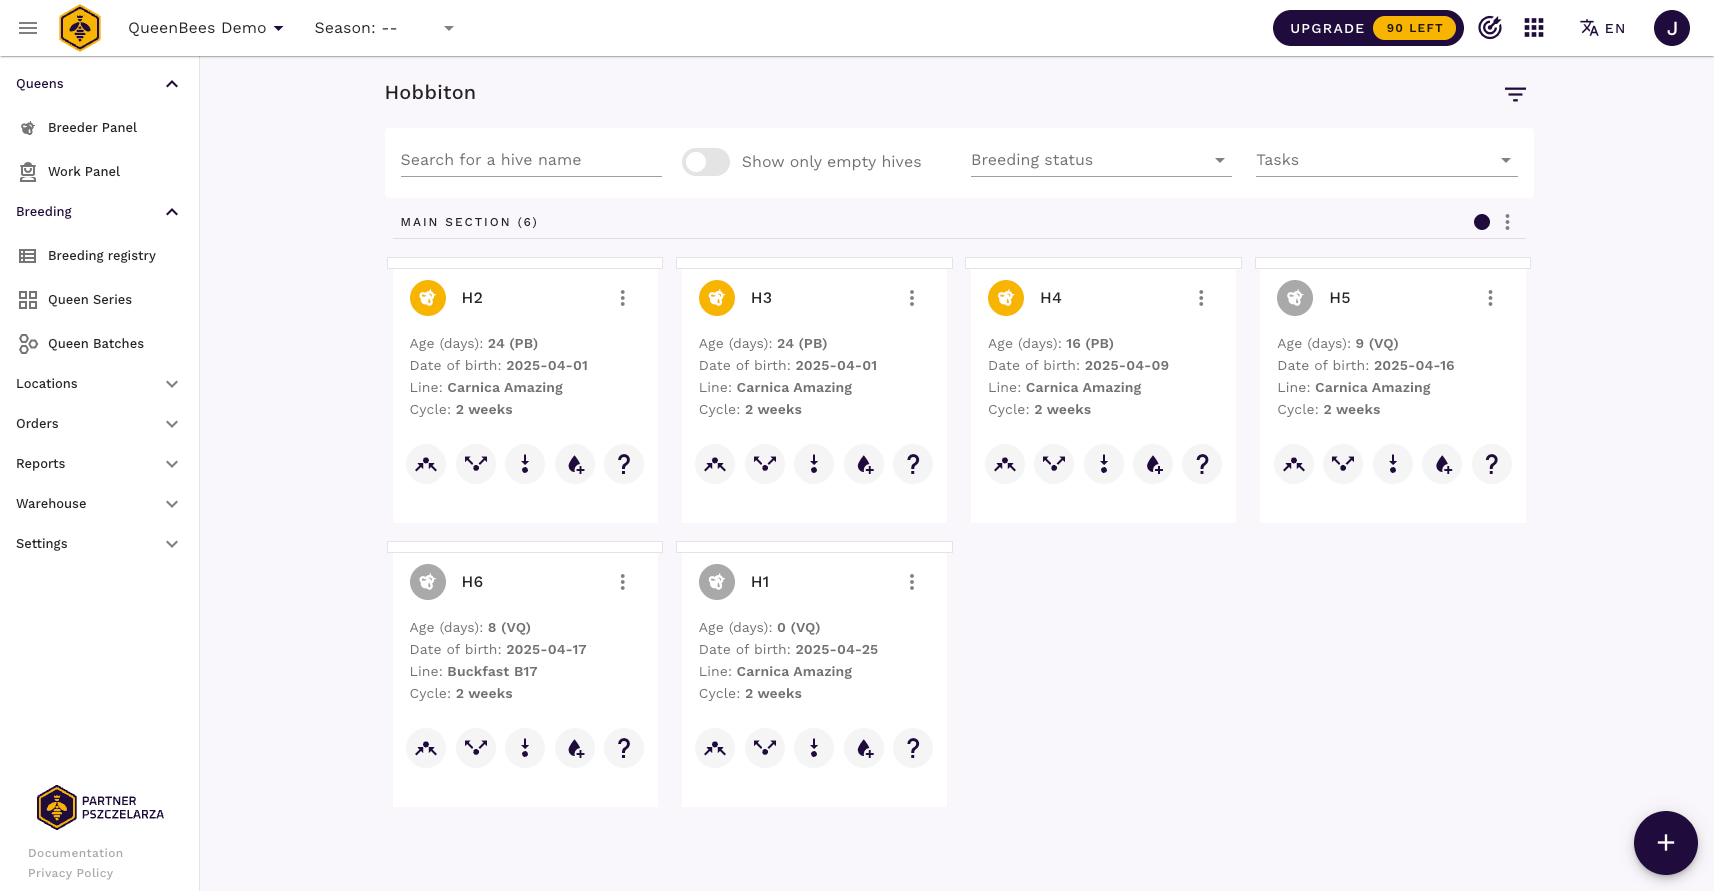
After adding queens, your location transforms from empty to a comprehensive tracking system:
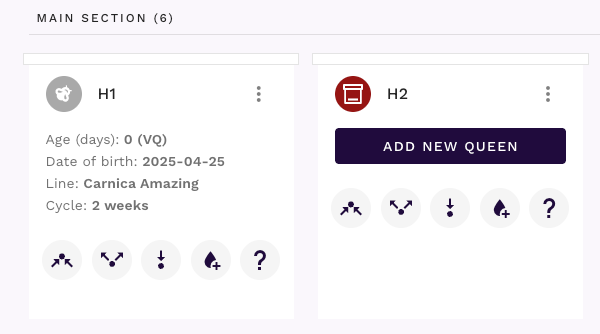
Continue adding queens to build your complete inventory:
Hint
For larger operations: Adding queens individually works for getting started, but Queen Batches dramatically speed up bulk operations.
QueenBees is designed for efficiency - explore batch features once you’re comfortable with the basics!
Step 4: Review Your Apiary Analytics
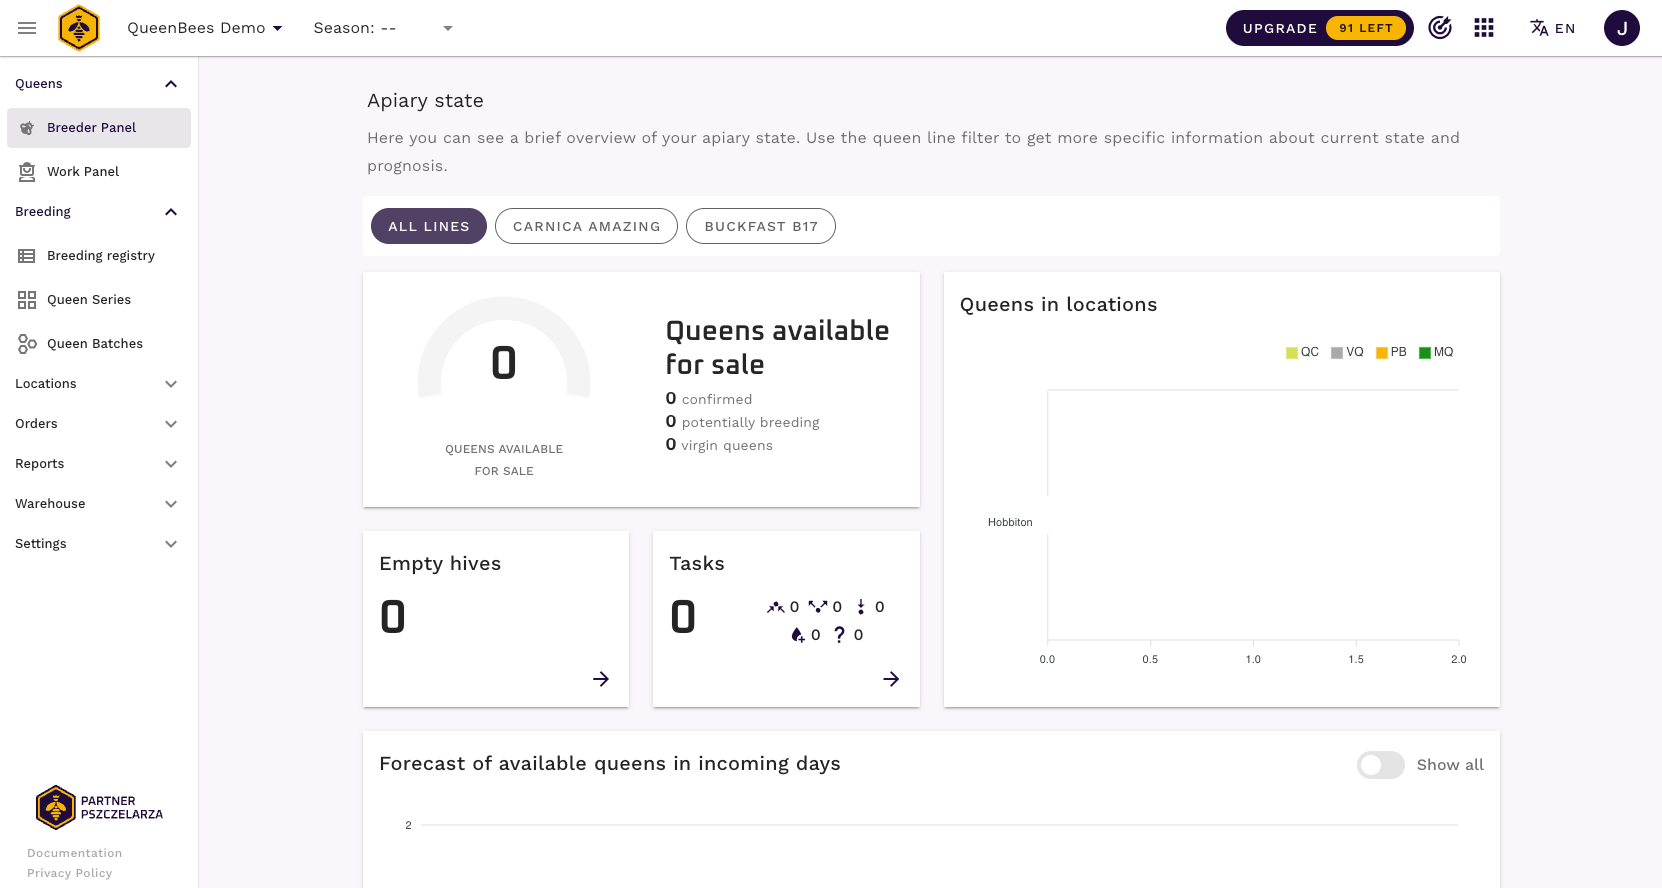
Return to your main dashboard to see how QueenBees transforms your data into actionable insights.
Access Your Breeder Panel
Navigate to Breeder Panel in the left menu or click the QueenBees logo.
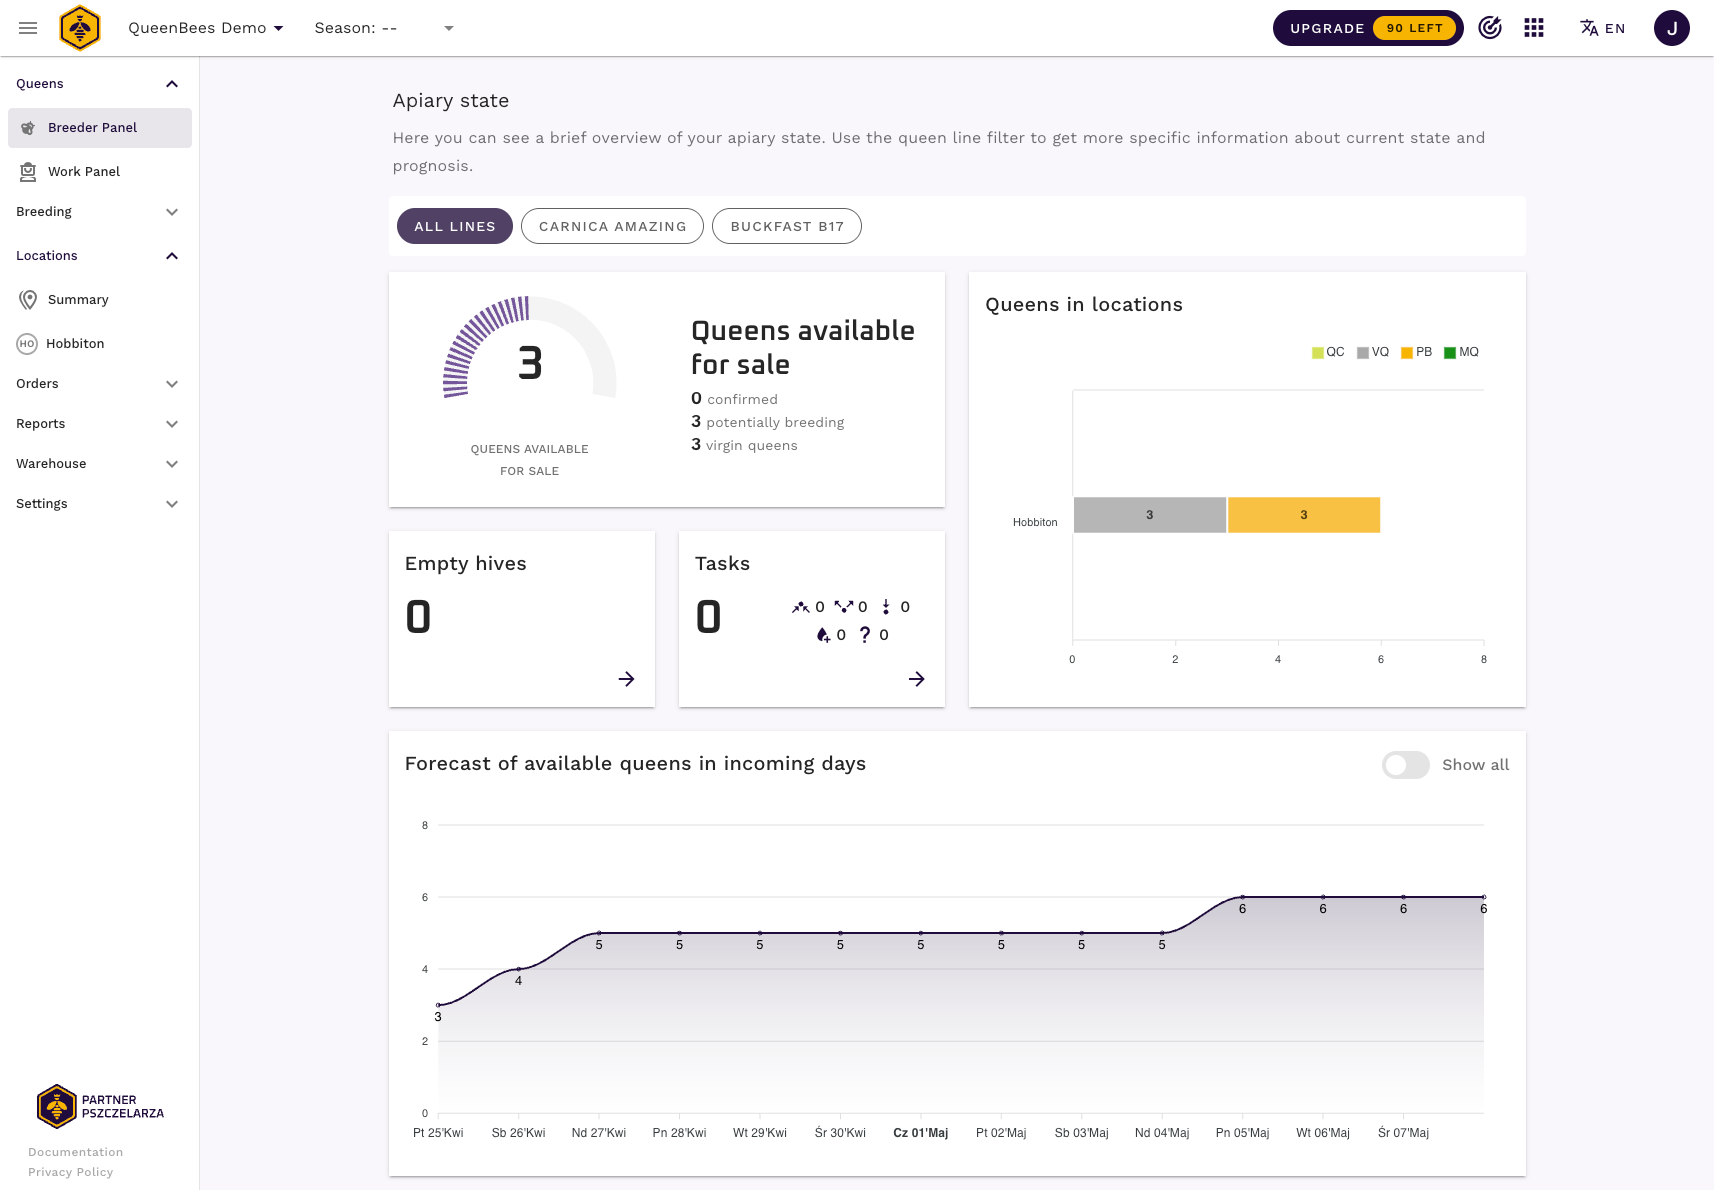
Understand Your Dashboard
Current Inventory Summary:
- Total hives and active queens
- Distribution across queen lines
- Age-based queen categorization
Automated Queen Status:
- Queen states based on age and breeding cycle
- Virgin queens ready for mating
- Productive queens in laying phase
- Queens approaching replacement age
Sales Forecasting:
- Queens available for immediate sale
- Projected production based on efficiency settings
- Seasonal planning insights
Example Analysis: In the sample above: 6 hives, 5 Carnica Amazing queens, 1 Buckfast B17 queen. The system automatically categorized queens by breeding status and calculated sales availability.
Next Steps: Expanding Your Operation
Immediate Actions
Explore core features:
Add more data:
- Import existing hive records
- Set up additional locations with location management tools
- Create breeding series for production planning
Advanced Features to Explore
Operational efficiency:
Business growth:
- Sales tracking and reporting
- Breeding program analytics
- Seasonal planning tools
Mobile productivity:
- Field data collection
- Quick queen updates
Your 3-Month Trial Period
What’s Included
Full feature access:
- Unlimited hives and queens
- Complete breeding management
- Advanced analytics and reporting
- Mobile applications
- Support with onboarding and importing data from your old tools
Making the Most of Your Trial
Week 1-2: Master the basics
- Complete this quick start
- Add all current hives and queens
- Explore the interface thoroughly
Week 3-8: Advanced features
- Set up breeding series
- Try customer order management
- Use mobile Focus Mode in the field
Week 9-12: Optimization
- Fine-tune workflows
- Train team members
- Plan subscription strategy
After Your Trial
Subscription options:
- Continue with full professional features
- Choose features that match your operation size
- Maintain free access to core data (read-only)
Data ownership:
- Your information remains accessible
- Export capabilities maintained
- No data hostage situations
Tip
Use your trial period strategically - this is enough time to fully integrate QueenBees into your operation and see real productivity gains. Most users see immediate benefits in organization and time savings.
Success Tips for New Users
Start Simple, Grow Big
Focus on basics first:
- Accurate hive and queen records
- Consistent data entry habits
- Regular system usage
Add complexity gradually:
- Breeding series and analytics
- Team access and permissions
- Advanced reporting features
Build Good Habits
Data entry consistency:
- Update records immediately after field work
- Use standard naming conventions
- Regular backup and review
System integration:
- Replace paper records gradually
- Train team members systematically
- Establish digital-first workflows
Maximize Value
Use all features:
- Don’t ignore analytics and forecasting
- Explore mobile capabilities fully
- Take advantage of our support
Congratulations! You’ve successfully set up QueenBees and taken the first steps toward modern, efficient apiary management. The system is now ready to support your daily operations, improve your breeding programs, and help grow your business.
Remember: QueenBees grows with your operation. Start with what you need now, and explore additional features as your business evolves. The platform is designed to support everything from hobbyist beekeepers to commercial operations managing thousands of hives.
Tip
Questions or need help? Don’t hesitate to contact our support team. We’re here to ensure QueenBees becomes an invaluable tool for your beekeeping success.