Locations: keeping track of your hives and queens
If you keep bees in more than one place, QueenBees helps you stay organized. Think of it as a way to keep track of which hives are where, just like you might use a notebook - but easier.
Understanding locations and areas
A location is anywhere you keep hives - your backyard, a farmer’s field, or that spot by the woods.
Within each location, you can create areas (called “sections”) to organize your hives. Maybe you put mating nucs on the north side and production colonies on the south side.

How it’s organized
Your Apiary
├── Home location
│   ├── North side (mating nucs)
│   ├── South side (production hives)
│   └── Main area (everything else)
└── Smith farm
    ├── Upper field
    └── Main area (everything else)
Getting started
- You need at least one location to place hives
- Each location automatically gets a “Main area” when you create it
- You can only remove empty locations (no hives left there)
- Location names need to be at least 3 letters long
Adding your next location
When you first set up your account, you’ll create your main location. After that, you can add more whenever you get access to new sites.
How to add a new location
- Click on your locations summary in left navigation
- Choose “Add new location” from the list
- Give it a name that makes sense to you
- Click Save

Your new location will have a “Main area” ready for hives.
Naming your locations
Pick names you’ll recognize right away:
- Home yard - where you started
- Back forty - if it’s behind your property
- Miller place - if you’re keeping bees on someone else’s land
- Cedar grove - simple numbering or landmarks work too
Organizing areas within your locations
Areas help you keep track of different groups of hives in the same location. Like keeping your breeder colonies separate from your honey production hives.
Why organize into areas?
- Keep breeding stock separate - your reproductive queens away from the queens naturally inseminated
- Group by purpose - training hives in one spot, mating hives in another
- Follow your location layout - front and back, east and west sides - you can experiment with different setups
- Different types of hives - classic hives separated from mini-plus type
- Control what count - exclude certain areas from your ‘ready to sell’ statistics
Adding areas to a location
- Open the location you want to organize
- Look for the “+” button in right bottom corner and choose “Add area”
- Give the area a name that allows you quick identification
- Decide if these hives count for sales - usually yes, but if you have reproductive queens or the ones in evaluation, you might want to turn this off
- Save it
About “counting for sales”
This just means whether hives in this area should be included when the app counts how many queens you have available to sell. Turn this off for:
- Hives you’re not using for production
- Your personal breeding stock you don’t sell from
- Experimental or research colonies
- Areas used for storage or wintering
When an area is excluded from sales counting, it also won’t appear in your main production statistics and forecasts. This keeps your numbers accurate and focused on what you’re actually selling.
Moving between your locations
Quick switching
Use the location name at the top of the screen to jump between locations. The app remembers which location you were looking at last.

What you’ll see for each location
When you look at a location, you’ll see:
- How many hives you have there
- Which hives are empty and ready for new queen
- Your queen count - how many are ready to sell
Location overview
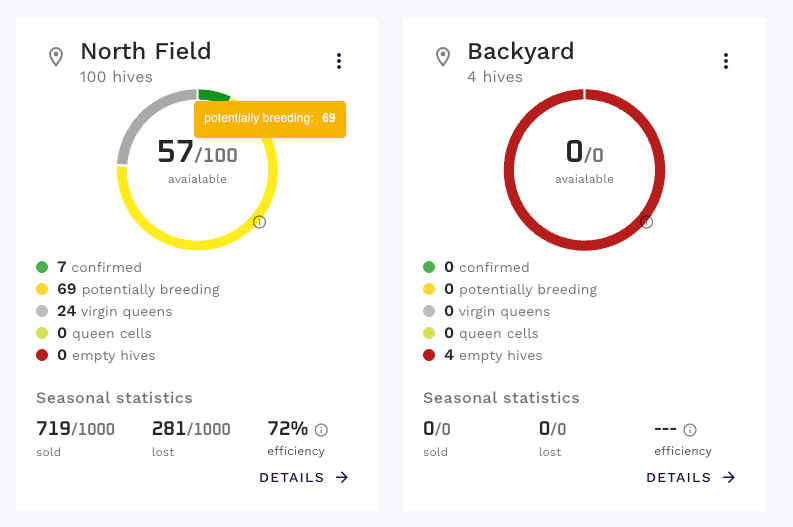
Each location shows you:
- Queen counts in each state - mated queens, virgin queens, cells developing
- Hive status - which ones are working, which are empty
- Available queens - how many should be ready soon
- Location efficiency - percentage of queens sold versus lost
Working with multiple locations
Moving hives around
Sometimes you need to move hives from one location to another:
- Select the hive you want to move
- Choose “Edit” from the options
- Pick where they’re going - which location and area
- Confirm the move
Fast queens take out
When it’s time to harvest queens — at the end of a mating cycle or before moving hives — use the Fast queens take out action to process multiple queens at once without opening each hive individually.
What it does
- Counts all available MQ (mated queens) and PB (potentially breeding) queens in a location or section
- You specify how many queens to take out and how many to mark as lost
- Queens are processed in priority order: MQ first, then PB for take outs; PB first, then MQ for lost
- Only queens from areas that count for sales are included
How to use it
From a location card (all sections combined):
- Go to your Locations overview
- Open the three-dots menu on a location card
- Choose “Fast queens take out”
- The modal will show how many MQ and PB queens are available
- Enter the number to take out (defaults to all available) and how many were lost
- Confirm — queens are updated instantly
From a single area (section-level):
- Open a location
- Open the three-dots menu on the area header
- Choose “Fast queens take out”
- Same flow as above, but only queens in that area are counted
Info
The “Fast queens take out” option is only visible when there are MQ or PB queens available. It won’t appear for empty areas or areas excluded from sales statistics.
Warning
This action cannot be undone. Queens marked as taken or lost will be updated immediately in your statistics and production forecasts.
Who can use it
This action is available to users with the Breeder, Owner, Admin, or Support role.
Removing a location
You can only remove a location after you’ve moved all the hives out of it. Hives might be moved one by one, or from section

Before removing a location
- Move all hives to other locations or mark them as sold/dead
- Check all areas are empty
How to remove it
- Go to location overview (look for the three dots icon on location card)
- Click “Delete” action
Warning
Be careful: Removing a location deletes all its areas too. Once it’s gone, you can’t get it back.
Simple ways to stay organized
Start small
- Begin with one location and add areas as you need them
- Use names that make sense to you - don’t worry about being fancy or too accurate
- Group similar hives together - makes your work easier
- Add new areas when you expand - no need to plan everything up front
Support and optimization
Questions or location management assistance:
- Contact our support team for calendar and planning questions
- Visit the contact page for workflow optimization consultation or new language request
- WhatsApp support for new features suggestions