Invoice management: professional sales documentation
The invoice management system in QueenBees has been designed with the specific needs of queen bee breeders in mind. We understand that every minute counts during peak season - that’s why we’ve automated the invoicing process, eliminating repetitive data entry and enabling invoice creation in just seconds.
Why invoice in QueenBees?
Traditional invoicing is time-consuming: manually transcribing customer data, products, prices, and then archiving documents. For an apiary shipping 20 packages daily, this can mean 2-3 hours of additional office work every day.
QueenBees solves this problem through invoice integration with orders. When you take an order over the phone, all the data needed for the invoice is already in the system. Issuing an invoice is a matter of a few clicks - averaging 15 seconds, instead of 5-10 minutes of manual work.
Info
QueenBees offers two invoicing modes: built-in system for basic needs and InvoiceOcean integration for advanced accounting features and automation. You can switch between them at any time.
Accessing invoices
The invoice functionality is available in two places:
Invoices in orders
Most commonly, invoices are issued directly from shipments in orders:
- Open the order details
- Expand the specific shipment
- Go to the “Documents” tab
- Click “Add invoice”
The system automatically retrieves:
- Customer data from the order
- Products and prices from the shipment (you select the items for the invoice)
- Sale date from the shipment date
- Payment method
This is the most efficient method - all data is ready, you just confirm and generate.
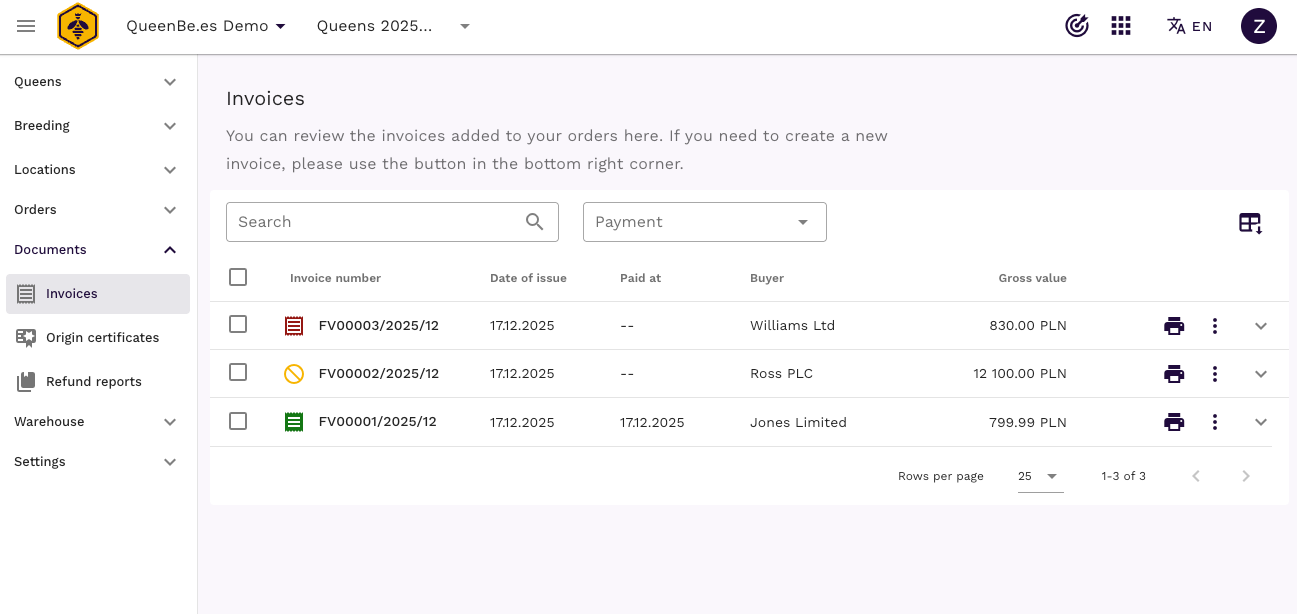
Complete invoice list
For a full overview of all issued invoices:
- Navigation: Left menu > Documents > Invoices
The list shows all invoices with the ability to:
- Search by number, customer, date
- Filter by payment status
- Preview and download PDFs
- Edit and perform additional actions on documents
Creating an invoice from an order
The quickest and most commonly used method for issuing invoices:
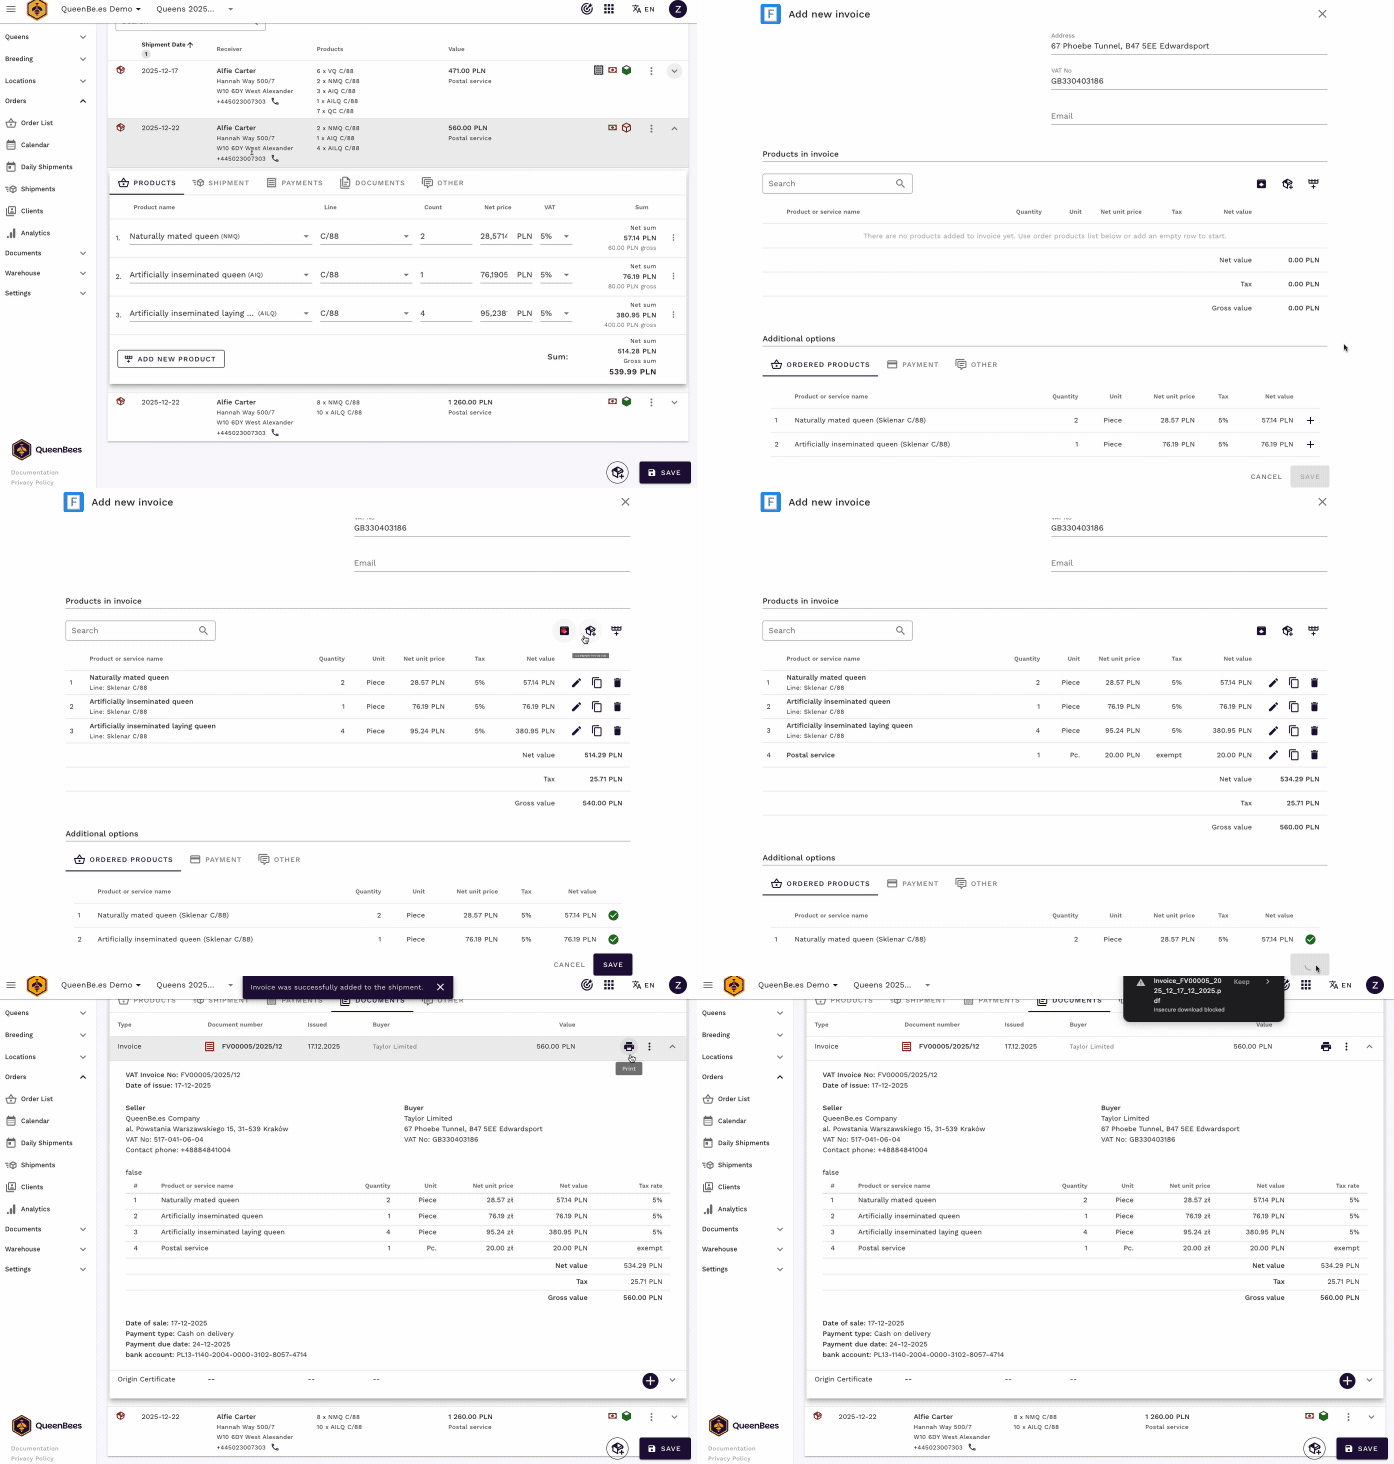
Step 1: Open the Shipment Documents Panel
- From the order list or shipping calendar, open the order
- Click on the shipment for which you want to issue an invoice
- Go to the “Documents” tab
Step 2: Create a new invoice
Click the “Add invoice” button. The system automatically:
- Fills in seller data from apiary settings
- Retrieves buyer data from the customer profile
- Loads products and prices from the shipment
- Sets the sale date to the shipment date
- Selects the appropriate payment method
Step 3: Review and adjust
The invoice panel contains the following sections:
Basic Information:
- Invoice number: Automatically generated according to series (you can change in settings). With InvoiceOcean integration, numbering is managed by their system.
- Issue date: Today’s date by default
- Sale date: From shipment date
- Payment due date: Automatically calculated according to default apiary settings (you can edit them)
Seller Data:
- Company name / First and last name
- Address
- VAT number or Personal ID (set in apiary profile)
- Phone number
Buyer Data:
- Automatically from order data
- Ability to edit if needed
- Support for companies, individuals, and beekeeping associations
Products and Services:
When adding an invoice from a shipment, invoice items from the order can be added with one click. In the product addition section you’ll find:
- List of products from the shipment
- Ability to add or remove items
- Edit quantities and prices
- Automatic calculation of net, VAT, and gross totals
- Support for different VAT rates (23%, 8%, 5%, 0%, exempt)
- Invoice summary with net, VAT, and gross values
- Support for VAT exemption
Payment:
- Payment method (cash, transfer, card)
- Payment status (paid/unpaid)
- Payment date
- Bank account number
Notes and Comments:
- Additional information for the customer
- Payment terms (VAT exemption)
- Other special notes/comments
Step 4: Choose invoicing mode
Tip
InvoiceOcean integration is available in Professional and Business plans. If you’re interested, contact us for activation.
QueenBees offers two modes:
Built-in mode (default)
The system generates simplified invoices locally:
- Simple and fast
- Requires no additional configuration and no external InvoiceOcean accounts
- Ideal for small and medium apiaries
- Invoices stored in QueenBees
- Locally managed numbering
- No support for advanced accounting features (supported with InvoiceOcean integration)
In this mode, only some invoice actions are available: adding, editing, deleting, downloading PDF. No option for cancellation or corrections - these options are available with InvoiceOcean connection.
InvoiceOcean integrated mode
Integration with a professional accounting system:
- Automatic synchronization with InvoiceOcean
- Numbering managed by InvoiceOcean
- All accounting features available in InvoiceOcean
- Automatic archiving on InvoiceOcean servers
You choose the mode in Settings > Main > Invoicing
Step 5: Save and Generate
Click “Save and generate”:
- System saves the invoice in the database
- Generates invoice PDF
- In InvoiceOcean mode, sends data via API to their system
- Invoice appears in shipment documents and invoice list
You can now:
- Download PDF for printing or sending
- Mark as paid when you receive payment
InvoiceOcean integration
Why InvoiceOcean?
InvoiceOcean is a popular invoicing system, trusted by hundreds of thousands of businesses. Integration with QueenBees combines the best of both worlds:
Integration benefits:
- Real-time synchronization: Invoices issued in QueenBees automatically appear in InvoiceOcean
- Professional numbering: InvoiceOcean system manages numbering according to your preferences
- Automatic archive: All documents securely stored in InvoiceOcean
- Extended functionality: Invoice cancellation, corrections, receipts - QueenBees delegates these operations to InvoiceOcean
- Multilingual support: Invoices in multiple languages for international customers
Integration configuration
To configure InvoiceOcean integration:
Create an InvoiceOcean account (if you don’t have one yet)
- Go to invoiceocean.com
- Register and configure basic company data
- Choose the plan that suits you
Get API token
- Go to Settings > Integrations > API Tokens
- Copy the API token for your account
Enter InvoiceOcean account data in QueenBees
- In QueenBees go to Settings > Main > Invoicing
- Select “InvoiceOcean” mode
- Paste the copied API token and account domain (e.g., yourcompany.invoiceocean.com)
- Test the connection
- Save settings

- Test the integration
- Issue a test invoice in QueenBees
- Check if it appears in InvoiceOcean
- Verify data accuracy
- Configure numbering and other settings in InvoiceOcean as needed
- Delete test invoices
- You’re ready to issue invoices!
Warning
Security: The API token is sensitive data. Never share it with third parties. QueenBees stores the token in encrypted form and uses secure HTTPS connection to communicate with InvoiceOcean.
How does synchronization work?
After activating the integration:
When creating an invoice:
- You enter data in QueenBees (as usual)
- System sends data to InvoiceOcean via API
- InvoiceOcean generates the invoice number
- Invoice PDF is downloaded and saved in QueenBees
- Invoice is available in both systems
The same applies to other operations:
- Invoice editing
- Invoice deletion
- Invoice cancellation
Tip
Best practice: Issue invoices in QueenBees (faster, everything in order context), and manage advanced accounting in InvoiceOcean.
Invoice cancellation
Sometimes it’s necessary to cancel an issued invoice - for example, when a customer cancelled an order or there was an error in the data. Now, thanks to InvoiceOcean connection, you can easily cancel invoices directly from QueenBees.
When can you cancel an invoice?
If you’re using InvoiceOcean connection, invoices can be cancelled in the following situations:
- Customer cancelled the order before shipment
- Incorrectly entered data
- Duplicate invoice was created
- Change in transaction terms
- There are newer invoices that prevent deletion of the old invoice while maintaining proper accounting numbering
Warning
Important: Invoice cancellation is a serious accounting operation. According to regulations, a cancelled invoice must be kept in documentation. The system automatically marks the document as “CANCELLED” and keeps it in the archive.
How to cancel an invoice
- Open the invoice list: from the main menu or shipment documents
- Select the cancellation option: from the menu (three dots) next to the selected invoice
- Provide cancellation reason in the window that appears
- Confirm cancellation
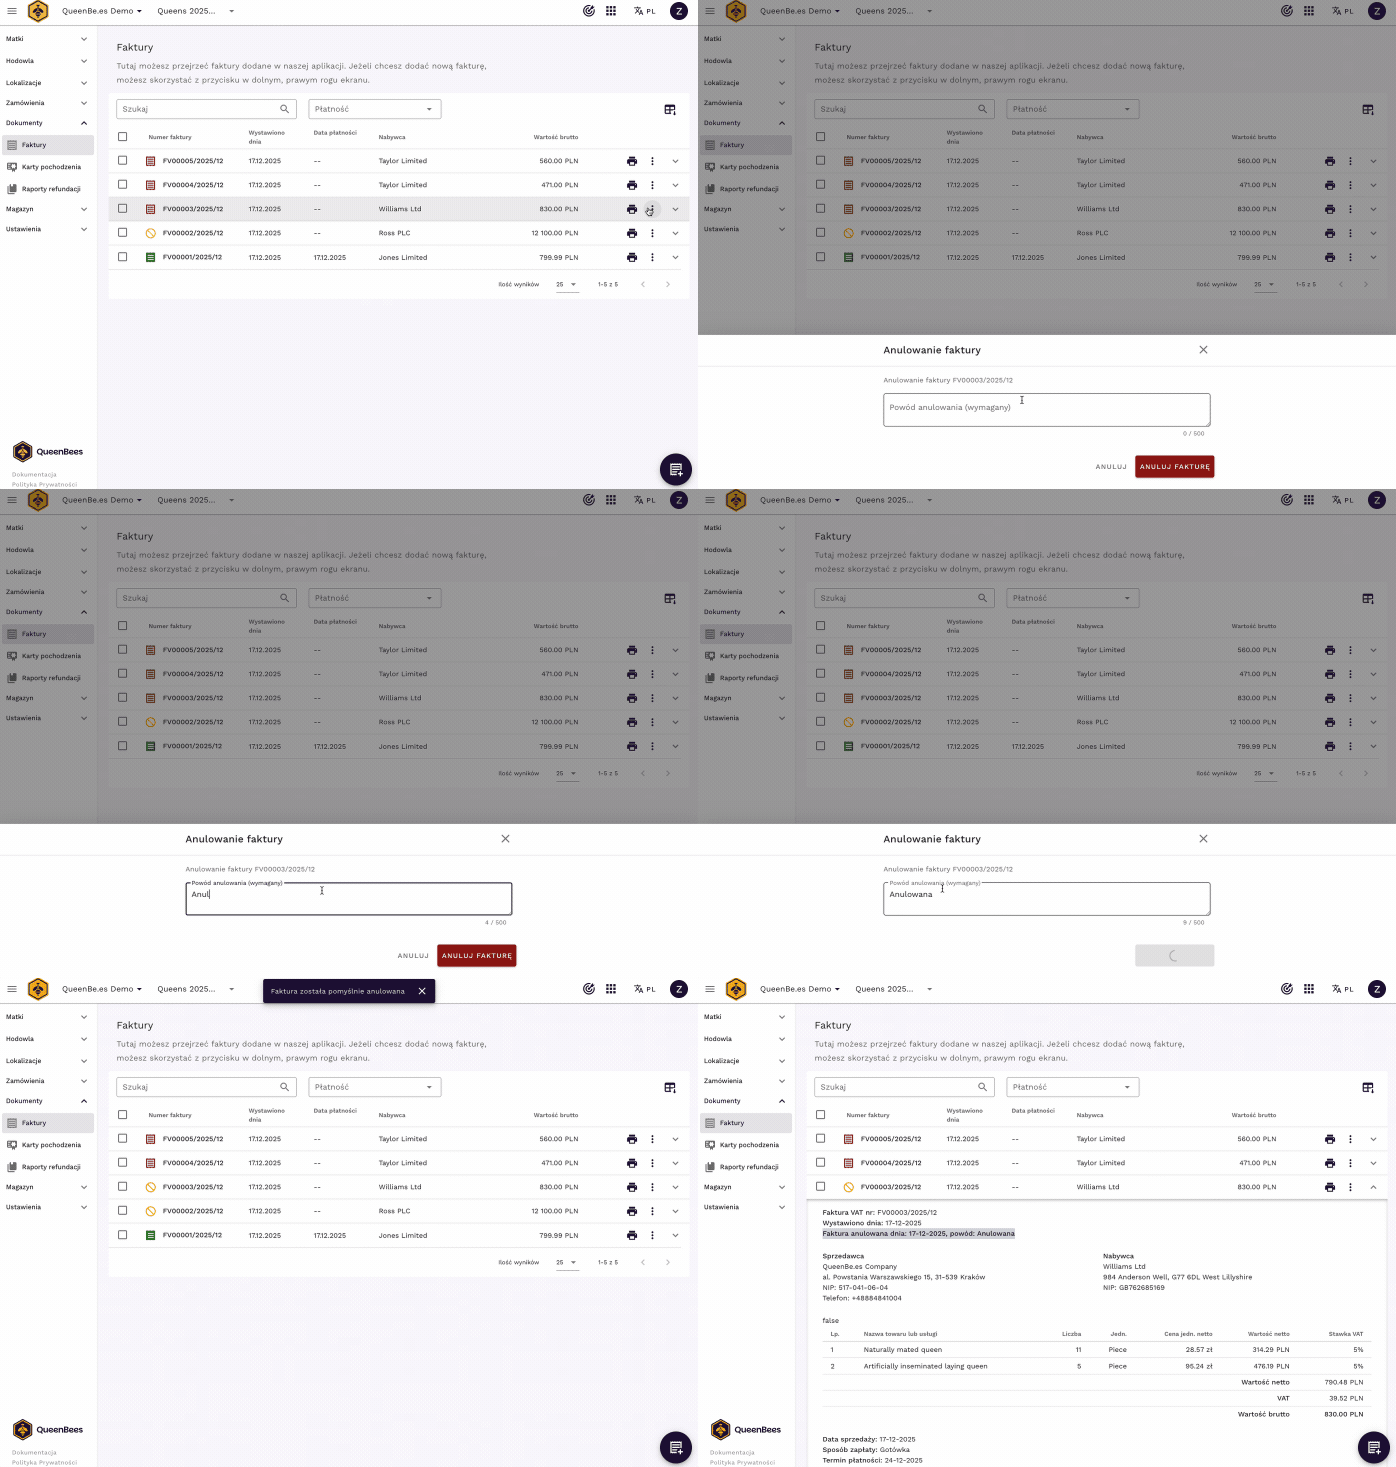
If the invoice was the most recent invoice issued in the system, instead of cancellation - it will be completely deleted (no gap in numbering). Otherwise, the invoice will be marked as cancelled.
Tip
If you cancelled an invoice by mistake, it cannot be restored. You must issue a new invoice with new data. This is in accordance with accounting requirements - a cancelled invoice must remain cancelled.
Marking an invoice as paid
When you receive payment:
- Open the invoice list: from the main menu or shipment documents
- Select the mark as paid option: from the menu (three dots) next to the selected invoice
- Provide payment date in the window that appears
- Confirm the change

The system automatically:
- Updates invoice status
- Changes icon to green (paid)
- If integration is configured, synchronizes payment with InvoiceOcean
Invoices and association refunds
For orders refunded by beekeeping associations, the invoice system offers the ability to quickly generate invoices that include association data and refunded products.
Non-VAT invoices
For beekeepers using VAT exemption (lump sum or small taxpayer):
- In apiary settings, check “VAT exemption”
- Enter the legal basis for exemption
- Invoices will be generated as non-VAT invoices
- System automatically adds the appropriate legal annotation
Note
According to applicable VAT law, supply of beekeeping products may be VAT exempt. Consult with your accountant to confirm your status.
Downloading invoices
You can download individual invoices as PDF at any time. With InvoiceOcean connection, the template selected in InvoiceOcean is used. In built-in mode, a simple, clear template with your logo is generated.
Legal requirements
The system meets legal requirements for invoice storage:
- Invoices stored for the required period (5 years)
- Original numbers preserved
- Impossible to delete or modify cancelled invoices
- Compliance with electronic invoicing regulations (with InvoiceOcean integration)
Support and help
Need help with invoicing in our application?
Configuration and integrations:
- Contact our team about InvoiceOcean activation
- We’ll help configure the integration step by step
- Free invoice migration from other systems
Training and support:
- Visit our contact page to schedule online training
- WhatsApp support for quick questions
- API documentation available for integrations
Legal and accounting:
- Consult with your accountant about VAT exemptions
- Check legal requirements for your type of business
- Ask about compliance with regulations in your situation
Summary
The QueenBees invoicing system was created to save you time and eliminate errors in sales documentation. Integration with orders and optional synchronization with InvoiceOcean make the process from order acceptance to invoice issuance take seconds, not minutes.
Next steps
After mastering the invoice system, explore related features:
- Order management: Complete process from phone call to shipment
- Shipping calendar: Production and delivery planning
- Refunded orders: Managing association grants
- Daily shipments: Preparing packages with invoices
Have questions about the invoicing system? Write to us - we’re happy to help!